


Star Schema Modeling with Pentaho Data Integration
Tutorial Details
Now why is this new feature so noteworthy:
Update: The Star Modeler was open sourced and is included in the latest versions of PDI/Kettle. Disregard the paragraph below.
The plug-in architecture of PDI allows to add new features quite easily. The Star Modeler can be downloaded from here (status: 2011-11-04). Unzip the file in the PDI plug-ins folder and (re)start Spoon. The Star Modeler will now show up as an additional perspective on the top right hand side.
Note: As said, this feature is still in development, so not everything might work as expected.
CREATE SCHEMA
source_db
;
USE
source_db
;
CREATE TABLE
revenue
(
date DATE,
country_iso_code VARCHAR(3),
revenue DECIMAL
)
;
INSERT INTO
revenue
VALUES
('2011-11-01','GB',22314),
('2011-11-02','GB',23411),
('2011-11-03','GB',22325),
('2011-11-04','GB',22233),
('2011-11-01','US',32423),
('2011-11-02','US',25325),
('2011-11-03','US',43523),
('2011-11-04','US',23453)
;
CREATE TABLE
Countries
(
country_iso_code VARCHAR(3),
country_name VARCHAR(100)
)
;
INSERT INTO
Countries
VALUES
('GB','United Kingdom'),
('US','United States of America')
;
Now let’s create our target database:
CREATE SCHEMA
target_db
;
Our aim is to create this rather simple star schema:

Click on the View tab and right click on Database Connections. Click on New then. Fill out all the details for both connections.
Once done, right click on them and choose Share:

Note: There will be a better way to define database connection details to be used with the Star Modeler in future.
Save your transformation.
Now that we have the connection details defined, let’s click on the Star Models perspective in the right top hand side corner:
You will be greeted by a blank screen. Now click on the New icon and choose Star Model:
Give the star model a name and description. Then choose target_db as our target database.

Click on Create New Model and fill out the form as shown below:
Let’s create our date dimension: Fill out as shown below. Make sure that you choose DATE as Dimension Type.

Now click on the Attributes definitions tab and then on Add default dimension fields:
You will realize that PDI proposes a quite complete date dimension structure out-of-the-box. What a time saver! We are for now quite happy with this (if you want, you can change this), and click on OK.
So we have now defined our date dimension. Let’s go ahead and work on our country dimension:
Click on New Dimension:

Define the following (Make sure you choose SLOWLY_CHANGING_DIMENSION for Dimension Type):
Next click on the Attributes definitions tab and click on Add default dimension fields: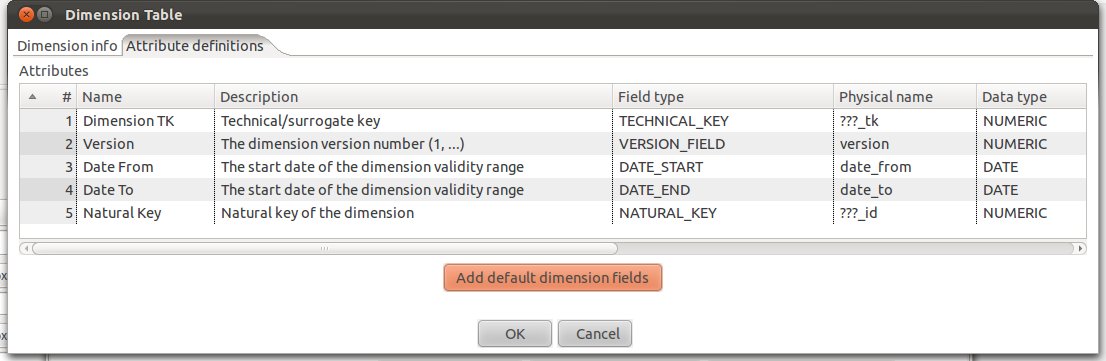
If you are familiar with Ralph Kimball’s slowly changing dimensions, you will realize that PDI makes really good suggestions. Just change:
It should look then like this:
Click OK.
Add an additional attribute called revenue, provide the details as shown below (make sure you also specify the source):
Our fact table is now properly defined.
Click on the Start model info tab and you will now see a simple graphical representation of our star model:
Click OK.

Tutorial Details
- Software (this tutorial was published on 2011-11-04 and download sources were correct on this date but might change in future):
- Download the latest version of PDI which includes the Star Modeler plugin (download here). If you run pdi-ce-4.3.0-M1, you can download the Star Modeler plug-in from here. Ideally though, just download the latest version of PDI.
- MySQL or similar database
- Star Schema file produced in this tutorial (download here)
- Knowledge: Intermediate (To follow this tutorial you should have good knowledge of the software and hence not every single step will be described)
Introduction
Matt Casters, lead developer of PDI, presented a new feature this week for modeling star schemata within PDI. It’s in the very early stages, but already showing huge potential and this is the reason why I thought I prepare a quick tutorial about it.Now why is this new feature so noteworthy:
- You can create your star schema model within the same interface as you create your ETL process, report models, analyzer models and which allows you to analyze your data as well. So, now it’s really like a start-to-finish environment.
- Other features can make use of the metadata you specified within the Star Modeler plug-in! In fact, one button click and PDI automatically generates a job which will run the DDL against the target database. Another click, and a simple ETL transformation gets automatically generated to populate your dimensions. You can use the transformation as a starting point and further improve it if necessary. In future you will be also able to auto-generate the reporting (Pentaho Metadata) model and the Mondrian (Pentaho Analysis) model. By how much will this speed up your development process? I would say a lot!
- From my point of view Matt also included some really nifty features, in example, when you specify a table as date dimension, you have the possibility to let PDI auto-generate one for you. The source data to target data mapping is also quite nicely integrated.
Update: The Star Modeler was open sourced and is included in the latest versions of PDI/Kettle. Disregard the paragraph below.
The plug-in architecture of PDI allows to add new features quite easily. The Star Modeler can be downloaded from here (status: 2011-11-04). Unzip the file in the PDI plug-ins folder and (re)start Spoon. The Star Modeler will now show up as an additional perspective on the top right hand side.
Note: As said, this feature is still in development, so not everything might work as expected.
Getting Ready
Let’s create our source tables, so that we have some data to work with. Run the following SQL statements in your favourite SQL client:CREATE SCHEMA
source_db
;
USE
source_db
;
CREATE TABLE
revenue
(
date DATE,
country_iso_code VARCHAR(3),
revenue DECIMAL
)
;
INSERT INTO
revenue
VALUES
('2011-11-01','GB',22314),
('2011-11-02','GB',23411),
('2011-11-03','GB',22325),
('2011-11-04','GB',22233),
('2011-11-01','US',32423),
('2011-11-02','US',25325),
('2011-11-03','US',43523),
('2011-11-04','US',23453)
;
CREATE TABLE
Countries
(
country_iso_code VARCHAR(3),
country_name VARCHAR(100)
)
;
INSERT INTO
Countries
VALUES
('GB','United Kingdom'),
('US','United States of America')
;
Now let’s create our target database:
CREATE SCHEMA
target_db
;
Our aim is to create this rather simple star schema:
Defining Database Connection Details
Start Spoon. Currently the Star Modeler sources database information from the shared.xml file. So if you haven’t locally share any of your database details yet, create an empty transformation and specify two database connection:- source_db
- target_db
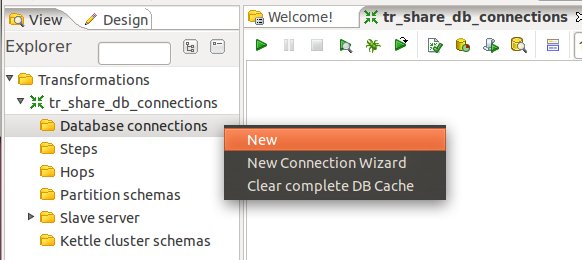
Click on the View tab and right click on Database Connections. Click on New then. Fill out all the details for both connections.
Once done, right click on them and choose Share:
Note: There will be a better way to define database connection details to be used with the Star Modeler in future.
Save your transformation.
How to Create a Star Model
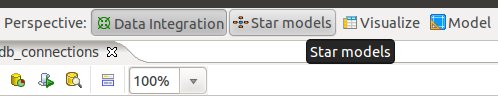
Now that we have the connection details defined, let’s click on the Star Models perspective in the right top hand side corner:
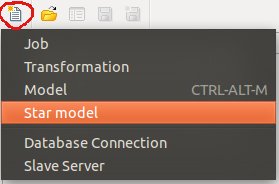
You will be greeted by a blank screen. Now click on the New icon and choose Star Model:
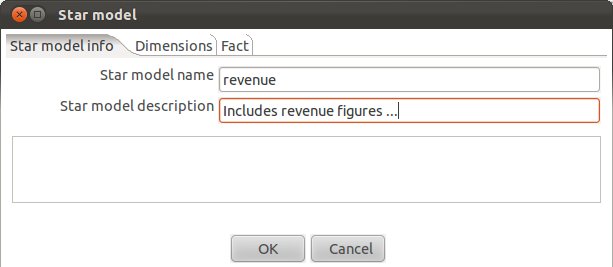
Give the star model a name and description. Then choose target_db as our target database.
Click on Create New Model and fill out the form as shown below:
Creating Dimensions
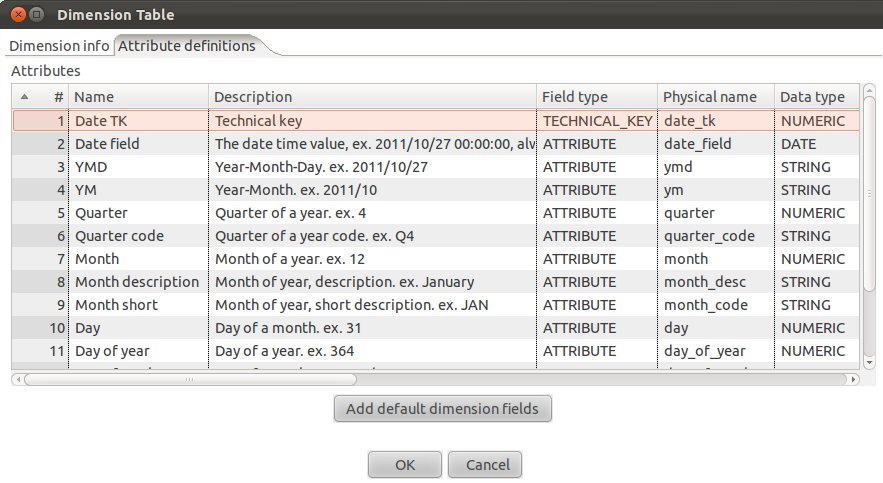
Next click on the Dimensions tab and click on New Dimension:Let’s create our date dimension: Fill out as shown below. Make sure that you choose DATE as Dimension Type.
Now click on the Attributes definitions tab and then on Add default dimension fields:
You will realize that PDI proposes a quite complete date dimension structure out-of-the-box. What a time saver! We are for now quite happy with this (if you want, you can change this), and click on OK.
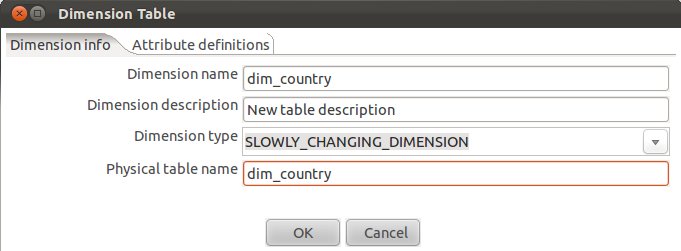
So we have now defined our date dimension. Let’s go ahead and work on our country dimension:
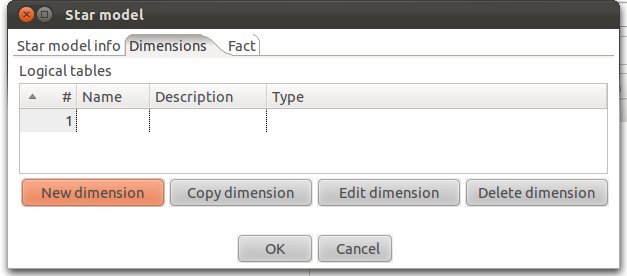
Click on New Dimension:
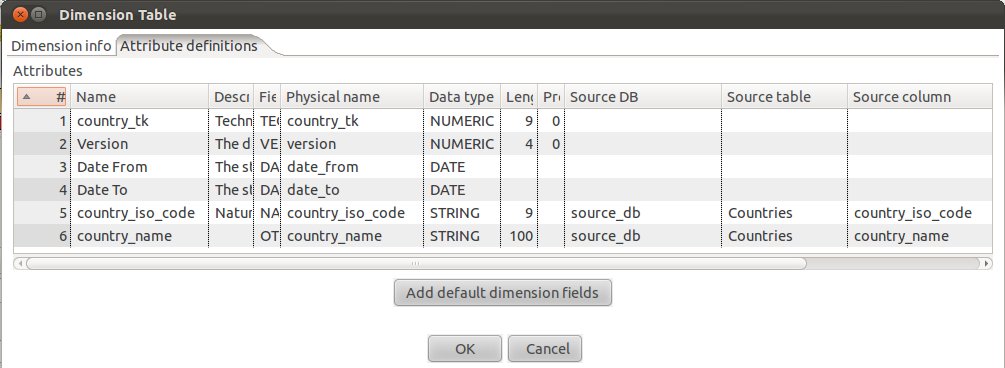
Define the following (Make sure you choose SLOWLY_CHANGING_DIMENSION for Dimension Type):
Next click on the Attributes definitions tab and click on Add default dimension fields:
If you are familiar with Ralph Kimball’s slowly changing dimensions, you will realize that PDI makes really good suggestions. Just change:
- the Physical names (replace the ??? with real names)
- the natural key to country_iso_code (data type: string) and add country_name as additional attributes.
- specify the Source DB, Source table and Source column for country_iso_code and country_name.
It should look then like this:
Click OK.
Creating a Fact Table
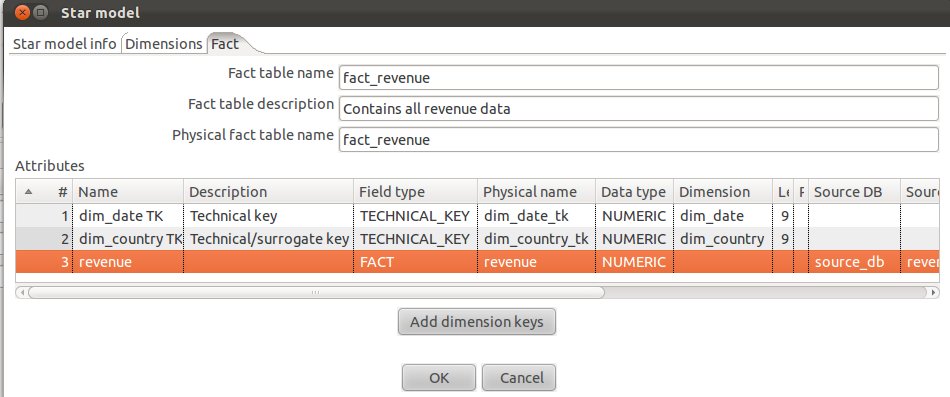
In the Star Model window click on the Fact tab and click on Add dimension keys. Now PDI automatically insert the technical keys of the dimensions we defined before.Add an additional attribute called revenue, provide the details as shown below (make sure you also specify the source):
Our fact table is now properly defined.
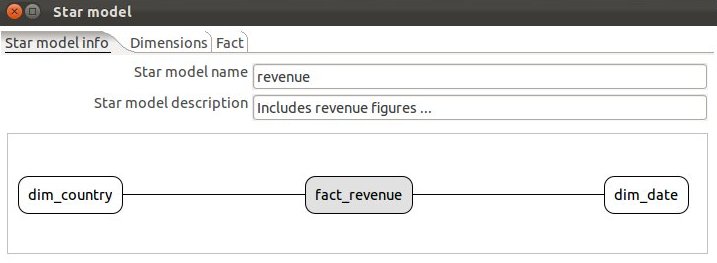
Click on the Start model info tab and you will now see a simple graphical representation of our star model:
Click OK.
Automatic Generation Features
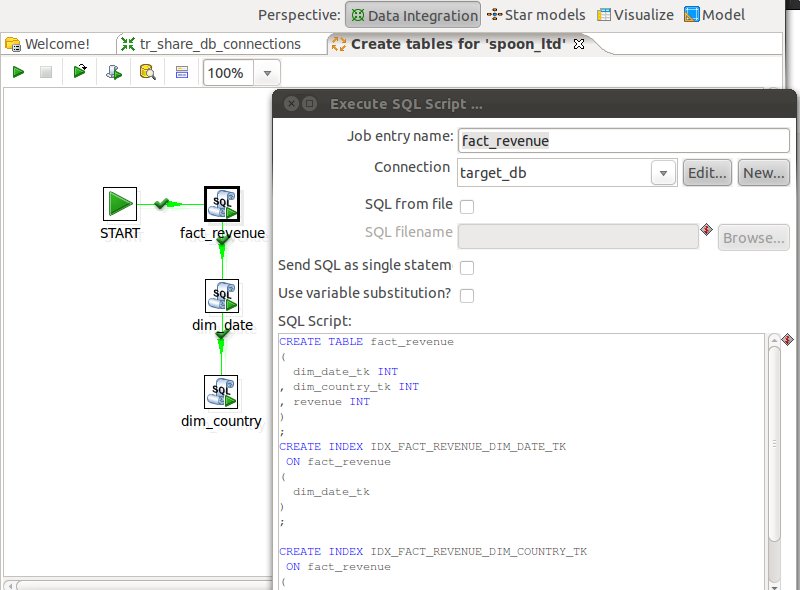
Now that our star model is defined, PDI gives us the option to automatically generate the following by just the click on a button:SQL DDL Job
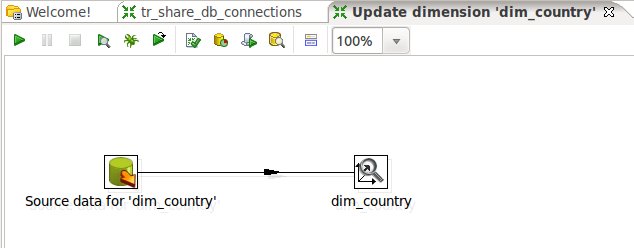
This job will allow you to automatically create the DDL for the target database. Just click on SQL Job and a second later you will see a job like this:Update Dimensions (Domain Job)
By clicking on Domain Job PDI will generate a simple transformation to update your dimensions:


0 comments:
Post a Comment