Community Server

  • Subscribe to our RSS feed.
  • Twitter
  • StumbleUpon
  • Reddit
  • Facebook
  • Digg

Saturday, 1 January 2011

Pentaho Data Integration and Infinidb Series: Bulk Upload

Posted on 04:37 by Unknown

Pentaho Data Integration and InfiniDB Series: Bulk Upload

Introduction
Prepare Tables
Using mainly Kettle steps
Check if file exists
Setup Infinidb job files
Load Tables
Delete text file
Round up
Using the power of shell scripts
Setup Infinidb job files
Load Tables
Delete text files
Round up
If things go wrong ... Error log is your friend
Files and references

Introduction

Calpont InfiniDB is one of the more popular column oriented databases. If you are not familiar with the concept of column oriented databases, I suggest visiting InfiniDB.org for a good overview. InfiniDB is available as an open source version as well as in a paid for enterprise edition. 

This is the first one is short series of articles on how to use Pentaho Data Integration (Kettle) with InfiniDB. A column oriented database is one of the main building blocks of a BI solution. In the last few years Kettle has become one of the most popular open source ETL tools. Currently there is no dedicated step in Kettle that allows the direct export of data into InfiniDB, but this doesn't mean that it is difficult to achieve. This article will show the fairly easy process of setting up such a solution. The article assumes that you are familiar with Kettle, Linux and InfiniDB.

Imagine that we have to load a data warehouse on an hourly basis. Our data warehouse has 3 fact tables that we want to populate using the InfiniDB bulk loader.

Our Kettle job will look like this:

  1. Start Job step
  2. A standard transformation with the results exported to a pipe separated text files (export happens within the transformation)
  3. Check if file exists
  4. Create InfiniDB Job file using the colxml utility
  5. Run bulk upload using the cpimport utility

I will not go into much detail about the 2nd step. For the purpose of this exercise I only created quite a simple transformation.

Prepare Tables

First off, let's create a special database on InfiniDB called dwh_test with three tables:

mysql> CREATE DATABASE dwh_test;
Query OK, 1 row affected (0.00 sec)

mysql> CREATE TABLE dwh_test.fact_impression (`count` INT(255)) ENGINE=infinidb;
Query OK, 0 rows affected (2.82 sec)

mysql> CREATE TABLE dwh_test.fact_click (`count` INT(255)) ENGINE=infinidb;
Query OK, 0 rows affected (1.09 sec)

mysql> CREATE TABLE dwh_test.fact_advert_event (`count` INT(255)) ENGINE=infinidb;
Query OK, 0 rows affected (0.37 sec)

For the following examples, please find the files here:


  • InfiniDB bulk load job (using mainly Kettle steps): download
  • InfiniDB bulk load job (using shell): download
  • Sample transformation: download

Export to text files 
Imagine that our job is run on an hourly level. The transformation exports three | (pipe) separated text files into the /usr/local/Calpont/data/bulk/data/import/ directory, which is the InfiniDB default bulk import directory. Infinidb accepts pipe separated text files per default, but you are free to use other separators as well.

For our ETL process, it is not always guaranteed that there is data for every run, which means, there is a possibility that there is no output data at all. This is something we have to keep in mind. Hence, one thing we can do in our main transformation is is to use a Switch/Case step to figure out if we have data in the stream (Note: There are other ways to do this check as well):


  • We have some sort of input etc, which we will not discuss here.
  • After the Group By step we add a Switch/Case step and create a hub from the first one to the second one
  • Add a Dummy step and a Text file output step
  • Create a hub from the Switch/Case step to the Dummy step
  • Create a hub from the Switch/Case step to the Text file output step
  • Now double click on the Switch/Case step and fill it out:

  • Set filed name to switch to the count field (but in theory it can be any field, as long as you know that it is definitely populate when data is available)
  • We add only one case leaving the value empty and setting the target step to a Dummy step. Leaving the value empty means that the field has to be NULL. So in case there are no records in the stream, the stream will be directed to the Dummy step.
  • The default target step is the Text file output step

  • Double click the Text file output:

  • Set the filename to /usr/local/Calpont/data/bulk/data/import/<tablename>. Replace <tablename> with the actual table name.
  • Set Extension to tbl
  • Click on the Content tab:

  • Set Separator to |
  • Leave the Enclosure field empty
  • Tick Enable the enclosure fix?
  • Untick Header
  • Set Format to Unix
  • Set Encoding to UTF-8. Note: InfiniDB only accepts UTF-8!

  • Fields tab: If your fields are not in the same order as the database columns, make sure you bring them now into the right order.

Find below a screenshot of the extremely simplified transformation:
Please find below two different solutions: The first one ("Using mainly Kettle steps") tries to solve most tasks in Kettle itself, whereas the second one makes a bit more use of shell script. It's down to you then to decide which one suits your project better.


Using mainly Kettle steps

It is advisable to check if the text output file of our transformation exists or not, otherwise Infinidb will throw an error. Our transformation should only create a file if there is data available.

The easiest approach is to use the Check if file exists step. 
This has two advantages: 


  • You don't have to write a shell script and 
  • It is OS independent. 
The disadvantage is that your flow gets quite a bit longer if you are importing more than one file.

The example below is for one file upload process only. 
The general flow is as follows:

  • Check if file exists step
  • Execute a shell script step: Create InfiniDB job file
  • Execute a shell script step: Execute bulk upload

Check if file exists

Create a new job in Kettle and insert 

  1. a Start step
  2. a Transformation step and link it to your main transformation
  3. Add a Check if file exists step to the canvas 
  4. Create hubs between the first three steps
  5. Add two Execute a shell script steps.
  6. Create a "Follow when result is true" hub to the 1st Execute a shell script step
  7. Create a "Follow when result is true" hub from the first Execute a shell script step to the second one.
  8. Add a Delete file step. Create a hub from the 2nd Execute a shell script step to this one.
  9. Double click on the Check if file exists step:

  • Add following file path: /usr/local/Calpont/data/bulk/data/import/fact_impression.tbl

Find below a screenshot of the job:

Setup Infinidb job files

Basically, the colxml utility creates the InfiniDB bulk job file in /usr/local/Calpont/data/bulk/data/job/ for you and accepts the database name ("dwh_test" in our example), a job number ("9993", which you can set to any convenient number) and the table name ("fact_impression") as command line arguments. For additional arguments please reference the Infinidb Admin manual. If you use another separator than the pipe, you have to mention it here as well.

Open the 1st Execute a shell script step; name it Setup Bulk Job. 

  • Double click on Load Tables and make sure the Insert script is ticked. 
  • Set the Working directory to /usr/local/Calpont/bin/  
  • Click the Script tab and insert following lines:

./colxml dwh_test -j 9993 -t fact_impression

Load Tables

Open the 2nd Execute a shell script step and name it Load Tables; create a hop from the Setup Bulk Job to this one (if you haven't done so already).

  • Double click on Load Tables and make sure Insert script is ticked. 
  • Set the Working directory to /usr/local/Calpont/bin/ 
  • Click the Script tab and insert following lines:

./cpimport -j 9993

cpimport is the Infinidb bulk upload utility. It accepts the job number as a command line argument. For additional arguments please reference the Infinidb Admin manual.

Delete text file

Now we also want to make sure that we clean up everything. 

  • Insert a Delete file step
  • Create a hop from the load Load Tables step to this one.
  • Double click on the Delete file step
  • Insert into the File/Folder cell the following: /usr/local/Calpont/data/bulk/data/import/fact_impression.tbl

Round up

Save the job and transformation, execute the job and check the InfiniDB table. In my case, everything happens on the command line on EC2:

[xxxx@ip-xxxx data-integration] nohup ./kitchen.sh -file="../my-files/testing/infinidb_bulk_upload_example/jb_infinidb_bulk_upload_example.kjb" -Level=Basic &
[xxxx@ip-xxxx data-integration] idbmysql
mysql> USE dwh_test;
Database changed
mysql> SELECT * FROM fact_impression;
+-------+
| count |
+-------+
|     3 |
+-------+
1 row in set (0.11 sec)

Note: To further improve this example, you should add a "Delete Files" step to the beginning of your job to delete any existing InfiniDB job files. 

Using the power of shell scripts

Setup Infinidb job files

First off, create and test a standard shell file. You can create it in any convenient folder. Depending on your Linux distribution, the syntax may vary. The example below is for RedHat Linux.

vi test.sh

Press i and insert following lines:

#!/bin/sh

[ -f /usr/local/Calpont/data/bulk/data/import/fact_advert_event.tbl ] && echo "File exists" || echo "File does not exist"

Press ESC :wq to write and close the file

Make the file executable:
chmod a+x test.sh

Run the shell script:
./test.sh

If you get an error back, try to fix it, otherwise we are ready to go ahead.

Create a new job in Kettle and insert 

  1. a Start step
  2. a Transformation step and link it to your main transformation
  3. an Execute a shell script step; name it Setup Bulk Job. 
  4. Create a hub from the Start step to the Transformation step and another one from the Transformation step to the Execute a shell script step

Next up:

  • Double click on Load Tables and make sure Insert script is ticked. 
  • Set the Working directory to /usr/local/Calpont/bin/  
  • Click the Script tab and insert following lines:

We slightly change the script now and include a check for all our files: We create a separate Infinidb job for each table import so that we can do some easy checking.

Basically, the colxml utility creates the bulk job file in /usr/local/Calpont/data/bulk/data/job/ for you and accepts the database name ("dwh_test" in our example), a job number ("9991", which you can set to any convenient number) and the table name ("fact_advert_event") as command line arguments. For additional arguments please reference the Infinidb Admin manual.

Before we request the new job files, we also remove all existing ones (in case there is no data, no text file will exist, hence no new job file would be created with our condition, but there might be still an old job file in the directory). 

#!/bin/sh
rm -rf  /usr/local/Calpont/data/bulk/job/Job_9991.xml
rm -rf  /usr/local/Calpont/data/bulk/job/Job_9992.xml
rm -rf  /usr/local/Calpont/data/bulk/job/Job_9993.xml

[ -f /usr/local/Calpont/data/bulk/data/import/fact_advert_event.tbl ] && ./colxml dwh_test -j 9991 -t fact_advert_event
[ -f /usr/local/Calpont/data/bulk/data/import/fact_advert_click.tbl ] && ./colxml dwh_test -j 9992 -t fact_click
[ -f /usr/local/Calpont/data/bulk/data/import/fact_advert_impression.tbl ] && ./colxml dwh_test -j 9993 -t fact_impression

Load Tables

Insert another Execute a shell script and name it Load Tables; create a hop from the Setup Bulk Job to this one.

  • Double click on Load Tables and make sure the Insert script is ticked. 
  • Set the Working directory to /usr/local/Calpont/bin/  
  • Click the Script tab and insert following lines:

#!/bin/sh
rm -rf  /usr/local/Calpont/data/bulk/job/Job_9991.xml
rm -rf  /usr/local/Calpont/data/bulk/job/Job_9992.xml
rm -rf  /usr/local/Calpont/data/bulk/job/Job_9993.xml

[ -f /usr/local/Calpont/data/bulk/data/import/fact_advert_event.tbl ] && ./colxml dwh_test -j 9991 -t fact_advert_event
[ -f /usr/local/Calpont/data/bulk/data/import/fact_advert_click.tbl ] && ./colxml dwh_test -j 9992 -t fact_click
[ -f /usr/local/Calpont/data/bulk/data/import/fact_advert_impression.tbl ] && ./colxml dwh_test -j 9993 -t fact_impression

cpimport is the Infinidb bulk load utility. It accepts the job number as a command line argument.  For additional arguments please reference the Infinidb Admin manual.

Delete text files

Now we also want to make sure that we clean up everything. 

  • Insert a Delete files step
  • Create a hop from the load Load Tables step to this one.
  • Double click on the Delete files step
  • Insert into the File/Folder cell the following: /usr/local/Calpont/data/bulk/data/import
  • and into the Wildcard (RegEx) cell: ^.+\.tbl$
This will delete any files ending in .tbl from this directory.

Find below a screenshot of the job:

Round up

Save the job and transformation, execute the job and check the InfiniDB table. In my case, everything happens on the command line on EC2:

[xxxx@ip-xxxx data-integration] nohup ./kitchen.sh -file="../my-files/testing/infinidb_bulk_upload_example/jb_infinidb_bulk_upload_example_using_shell.kjb" -Level=Basic &
[xxxx@ip-xxxx data-integration] idbmysql
mysql> USE dwh_test;
Database changed
mysql> SELECT * FROM fact_impression;
+-------+
| count |
+-------+
|     3 |
+-------+
1 row in set (0.11 sec)

If things go wrong ... Error log is your friend

InfiniDB provides quite good error logging. You will find a short error description in the Kettle log (make sure you output the basic log data to a file).
Have a look at following directories to find the detailed InfiniDB log files:

/usr/local/Calpont/data/bulk/log:

  • errors can be found in job_#.err
  • successful jobs will be logged in job_#.log

/usr/local/Calpont/data/bulk/data/import:

  • If the data of the import file does not match the table definition, then a file tablename.tbl.bad will be created. 

Files and references

Please find the example files here:
InfiniDB bulk load job (using mainly Kettle steps): download
InfiniDB bulk load job (using shell): download
Sample transformation: download

Some information for this article was taken from the Calpont Infinidb manuals as well as from the Pentaho forums.
Read More
Posted in | No comments

Sunday, 12 December 2010

Be careful with running multiple step copies in Pentaho Kettle

Posted on 02:22 by Unknown

Be careful with running multiple step copies in Pentaho Kettle

In this review we have a look at running multiple copies of one step in Kettle (Pentaho Data Integration). If your computer has more than one core, Kettle can use the power by running multiple copies of a given step in parallel. Each copy of one step uses one core. This is an extremely powerful feature, but it should be used with care. 
It is important to consider that you cannot just thoughtlessly apply x amounts of copies to any given step. You always have to keep in mind what this step actually does.

I prepared here an example which will demonstrate you how you can run into troubles if you don't pay attention. Note: This is not a Kettle error, but a user error. 

You can download the sample transformation here.

Scenario 1: This simple example uses a data grid input step. The data is denormalised and then joined to an additional data set and finally we create a summary.

Scenario 2: We use exactly the same process again, only now we increase the amount of copies for the denormaliser step to 3.You can change the amount of copies to run in parallel by right clicking on the step and choosing "Change number of copies to start ...". All this does is use the definition of your step and run multiple copies of this step in parallel (highlighted by x3 on the top left corner of the step). 

Screenshot of our transformation:


Output of the denormaliser step scenario 1:

Output of the denormaliser step scenario 2 (running 3 copies of the denormaliser step):

Output of the Group by step scenario 1:

Output of the Group by step scenario 2:

As you can see, there is a huge difference in the total amount of additional revenue in scenario 2:
The aggregation of our original sales records works fine, but as you can see in the preview the additional sales figures are 3 times as much as they should be, which is due to the 3 copies of the "Row denormaliser 2". This is down to the fact that we forgot to aggregate the output of this step.

So why did this happen? How does it work when you run multiple copies of a step?

Basically Kettle distributes rows in a round-robin fashion to each copy of the step, so in our example (running 3 copies of one step) the first row will go to the first step, the 2nd row to the 2nd step, the 3rd row to the 3rd step, the 4th row to the 1st step and so on. 

What is the correct approach to create this transformation using multiple copies?

After the denormalise step, we add a group by step to summarize the data by date:
Now the output of the Group by step looks fine:


Note: If you placed the Join step directly after the denormaliser step (set to multiple copies), Kettle would show a warning message, indicating that you have to summarize your data before the join. Sometimes you will have some additional steps between the step that your run in multiple copies and a join, hence no warning message is displayed. 

After applying multiple copies to one step I strongly suggest that you make use of the preview function to analyze how your data set looks.

You can download the transformation here.

Read More
Posted in | No comments

Saturday, 27 November 2010

How to Set Up Pentaho Community Build Framework

Posted on 10:56 by Unknown
How to Set Up Pentaho Community Build Framework 
  1. Introduction
  2. Pentaho BI Server Setup with CBF
      1. Java, Tomcat and Ant
        1. Set environment variables
          1. Using the GUI
          2. Using Command Line
        2. Check Ant and Java are working
        3. Creating the .ant directory
        4. XMLTask.jar
      2. Subversion
      3. Database
      4. CBF Build XML
      5. Download a BI Server Build
      6. Create build.properties
      7. Start Hypersonic DB
      8. Create the build
    1. Ubuntu (Linux) Setup
      1. Using Applications > Ubuntu Software Center
      2. Using Terminal
      3. Create the .ant Directory
      4. XMLTask.jar
      5. CBF Build XML
      6. Download a BI Server Build
      7. Create build.properties
      8. Create patches
    2. Mac OS X Setup

Introduction

Please note that I am still writing on this article. I will update some parts later on. For some parts I have open questions that still have to be clarified. If you have any ideas/suggestions, please let me know and I happily will add it to this article.

Some sections were also copied from other sources, some of which are mentioned in the "Sources" section.

In the following chapters we will have a look at how to set up an easily maintainable environment. This article is not an introduction to Pentaho. I assume that you are familiar with the Pentaho products.

We will look at how to set up the Pentaho BI Server with the Community Build Framework (CBF). 

Why would you use CBF?
  • Easily upgrade to new version of the BI server without going through a long setup process
  • Easily create environment specific versions of your BI server without going through a long setup process

Pentaho BI Server Setup with CBF

Sources:
(OS)BI Blog
Pentaho Wiki

Introducing Community Build Framework

We are in the lucky position that Pedro Alves from Webdetails offers the freely available CBF (Community Build Framework), which makes setting up and upgrading the BI Server for various environments a relative easy task. I try to talk you through the setup for the most popular operating sytems.


The main folder/file structure of CBF looks like this (simplified):


  • CBF
    • Pentaho BI Server source code folder(s): Each version of the source code will be stored in one folder. These folders are left completely untouched. Changes to the original source can be made via patches.
    • Project folder(s): For each project you can create a separate folder (i.e. project-nike, project-puma, ...) which holds the project specific configurations and files.
      • config
        • build.properties file, which tells ant what and where we want to build. A minimal config contains the path to your Java compiler, solutions and web server (among others). 
        • build-env.properties (optional) where env is a placeholder for any environment. So you could name it build-prod.properties, build-test.properties etc. This is very neat as you can have global settings in the build.properties and environment specific ones in the specific build-env.properties. When we are using Ant to build our BI server, ant will load the build.properties and then use the specific build-env.properties.
      • patches: all files that need some kind of modification are copied here from the source code (maintaining nearly the same folder structure) and replacing constant values with tokens in form @tokenname@. The tokens are specified in the build.properties.
      • solution: This folder holds your reports, xactions etc. (same as Pentaho solutions folder on standard BI Server)
    • Target-Build: All source code files will be copied to this folder to build your BI server. All patches will be applied to this BI server.
    • Target-Dist: The BI Server will be copied to this folder after everything has been built
    • build.xml: Note that any build.xml doesn't work with all versions of the BI server. When downloading make sure you choose the version of build.xml that accepts the version of your BI server. 

Note that the Pentaho BI Server source code folder(s), target-build and target-dist are shared among all projects. target-build and traget-dist are handled by ant, so you don't have to do anything about them.


Note: Currently the main folder structure has to be created mostly manually.


Create following folder structure to start with. This is common for all operating systems. We will discuss soon OS specific steps.

  • Pentaho
    • CBF
      • bi-server-source
      • project-tutorial
        • config
        • patches
        • solution
      • target-build
      • target-dist


The folder for the source code will be created automatically once we download the code with SVN.


In general, the below is how a folder structure could look like after completion of the setup. Ours will look slightly different.


CBF
|-- build.xml
|-- pentaho
|   |-- bi-platform-api
|   |-- bi-platform-appserver
|   |-- bi-platform-assembly
|   |-- bi-platform-assembly-open
|   |-- bi-platform-build
|   |-- bi-platform-engine-core
|   |-- bi-platform-engine-security
|   |-- bi-platform-engine-services
|   |-- bi-platform-legacy
|   |-- bi-platform-plugin-actions
|   |-- bi-platform-plugin-services
|   |-- bi-platform-repository
|   |-- bi-platform-sample-data
|   |-- bi-platform-sample-solution
|   |-- bi-platform-scheduler
|   |-- bi-platform-test-foundation
|   |-- bi-platform-ui-foundation
|   |-- bi-platform-util
|   |-- bi-platform-web
|   |-- bi-platform-web-portlet
|   |-- bi-platform-web-servlet
|   |-- dummy-jre
|   |-- mantle
|   `-- test-solutions
|-- project-client
|   |-- patches
|   |   |-- pentaho
|   |   `-- target-preconfiguredinstall
|   `-- solution
|-- target-build
`-- target-dist


The pentaho directory is where we will copy the a recent build of Pentaho BI Server. The idea is to leave this directory untouched and do all changes in the project-client directory. The below is an example structure, which depends on your specific project needs:


project-client/
|-- config
|   |-- build.properties
|   `-- build-pedro.properties
|-- patches
|   |-- target-build
|   |   `--
|   `-- target-dist
|       `-- server
|            |-- conf
|            |   |--
|            |   `-- jboss-service.xml
|            |-- webapps
|            |   |-- pentaho
|            |   |   `-- WEB-INF
|            |   |       `-- web.xml
|            `-- lib
|                `-- postgresql-8.2-505.jdbc3.jar
`-- solution
    |-- Portal.properties
    |-- Portal.url
    |-- Portal_pt.properties
    |-- admin
    .... etc

Pedro Alves explains: 
"The idea is very simple: 
  • All changes that would normally go to pentaho/* are placed under "patches" directory (project-client/patches/). 
  • The CBF ant script will pick up the files in the project-client/patches/ directory, scan for tokens and replace the tokens with the variables defined inside the project-client/config/build.properties files, and copy the files to the top level directory of the entire project (In this example MyProjectDir [remark: here we change it to CBF]). 
  • It's not recommended to patch anything under pentaho/*; sources changes are patched in to target-build/* and all other changes are made by patching the final directory, target-dist."


Windows setup

Please note that I set up everything in the directory D:\Pentaho. You might want to choose a more convenient folder for your own project.

Java, Tomcat and Ant

If you don't have Java, Tomcat and Ant running already, install them:
  • Java: JDK [Java Standard Edition; short Java SE] (JRE is not enough as Ant needs JDK to work properly). Read installation instructions. Install it in D:\Pentaho
  • Tomcat: At the time of writing, v6 was the most recent one.  The location of the tomcat directory is not important; it can be placed almost any where. The location of the tomcat will be set inside of the CBF build.properties file. I installed Tomcat in D:\Pentaho
  • Ant: Download Apache Ant 1.8.1 and place it in D:\Pentaho. Installation notes: here.

Set environment variables

Using the GUI
Windows 7: Control Panel > System > Advanced System Settings > Click on the Environment Variables button

Set the JAVA_HOME environment variable to the directory where you installed JDK: 
  1. Click on New under the System variables section.
  2. Type JAVA_HOME in the variable name field.
  3. Type D:\Program Files\Java\jdk1.6.0_21 in the variable value field

Set the ANT_HOME environment variable to the directory where you installed Ant: 
  1. Click on New under the System variables section.
  2. Type ANT_HOME in the variable name field.
  3. Type C:\ant in the variable value field.


Set the PATH environment variable to include the directory where you installed the Ant bin directory: 
  1. Find the PATH environment variable in the list. If PATH is not listed, click on New under the System variables section.
  2. Type %ANT_HOME%\bin;%JAVA_HOME%\bin;
Important: If there are other variables listed, create a new variable separated by a semicolon. Ensure there are no spaces before or after the semicolon.

Windows Note:
The ant.bat script makes use of three environment variables - ANT_HOME, CLASSPATH and JAVA_HOME. Ensure that ANT_HOME and JAVA_HOME variables are set, and that they do not have quotes (either ' or ") and they do not end with \ or with /. CLASSPATH should be unset or empty.
Using Command Line
Assume Ant is installed in c:\ant\. The following sets up the environment:

set ANT_HOME=c:\ant
set JAVA_HOME=c:\jdk-1.5.0.05
set PATH=%PATH%;%ANT_HOME%\bin;%JAVA_HOME%\bin;

Check Ant and Java are working

You can check the basic installation by opening a new shell and typing ant. You should get a message like this

Buildfile: build.xml does not exist!
Build failed

or something like this:

D:\Pentaho\CBF>ant
Buildfile: D:\Pentaho\CBF\build.xml

BUILD FAILED
D:\Pentaho\CBF\build.xml:7: FATAL: 'project' property not set. Please provide it
 the ant command, eg: ant -Dproject=myproject -Denv=dev


So Ant works. This message is there because you need to write an individual buildfile for your project. With a ant -version you should get an output like

D:\Pentaho\CBF>ant -version
Apache Ant version 1.8.1 compiled on April 30 2010

Type in Java, hit Enter and you should get same info back:

D:\Pentaho\CBF>java
Usage: java [-options] class [args...]
           (to execute a class)
   or  java [-options] -jar jarfile [args...]
           (to execute a jar file)

where options include:
    -client       to select the "client" VM
    -server       to select the "server" VM
    -hotspot      is a synonym for the "client" VM  [deprecate
                  The default VM is client.

    -cp <class search path of directories and zip/jar files>

If you have problems with either Ant or Java, check that your environment variables are properly set.

Creating the .ant directory

For our work we will need an optional ant task that is not available with the default set up. In your ant directory you find a file called build.xml.

This is an Ant script that you can run to install almost all the dependencies the optional Ant tasks need.

To do so, change to the ANT_HOME directory and execute the command:

ant -f fetch.xml -Ddest=user

You should see then something like this (extract):

D:\Pentaho\apache-ant-1.8.1>ant -f fetch.xml -Ddest=user
Buildfile: D:\Pentaho\apache-ant-1.8.1\fetch.xml

pick-dest:
     [echo] Downloading to C:\Documents and Settings\diethard.steiner\.ant\lib

probe-m2:

download-m2:
     [echo] Downloading to C:\Documents and Settings\diethard.steiner\.ant\lib
    [mkdir] Created dir: C:\Documents and Settings\diethard.steiner\.ant\lib
      [get] Getting: http://ibiblio.org/maven2//org/apache/maven/maven-artifact-
ant/2.0.4/maven-artifact-ant-2.0.4-dep.jar
      [get] To: C:\Documents and Settings\diethard.steiner\.ant\lib\maven-artifa
ct-ant-2.0.4-dep.jar

In general, options for Ddest are:
  • system - store in Ant's lib directory 
  • user - store in the user's home directory
  • optional - store in Ant's source code lib/optional directory, used if building Ant source code

If you go to your user directory now, you should see the .ant folder. 

XMLTask.jar

Download XMLTask.jar from here and move the jar file to the .ant\lib\ folder.

Subversion

Install on of the distributions. I provide here a list of options, choose one that suits you:
    • CollabNet Subversion Edge 1.2.2 
    • http://www.sliksvn.com/en/download and a client like http://tortoisesvn.net/downloads or subclipse (an Eclipse plugin). For some additional info have a look here: http://www.codinghorror.com/blog/2008/04/setting-up-subversion-on-windows.html 
    • Hudson is also an option as it includes subversion
    • Or download http://www.cygwin.com/ and issue the Linux command.

Database

Let's get started with Hypersonic DB, let on you can change to your own choice of DB.
  • Download HSQL 2.0 http://sourceforge.net/projects/hsqldb/files/ and save it in a convenient folder
  • Start the DB Server by double clicking on runServer.bat (in D:\Pentaho\hsqldb-2.0.0\hsqldb\bin)

CBF Build XML

Create the directory D:\Pentaho\CBF. Download CBF's build.xml from the Wiki Page and rename it to build.xml. Save it in Create the directory D:\Pentaho\CBF

Download a BI Server Build

Open the command prompt (DOS Client) and go to this folder. Change to D:\Pentaho\CBF\bi-server-source\ and issue following command to download (check out) BI Server 4:

svn co svn://source.pentaho.org/svnroot/bi-platform-v2/branches/4.0

If you are under a proxy you can use http:// instead of svn:// 
 
svn co http://source.pentaho.org/svnroot/bi-platform-v2/branches/4.0

You will see if the command is working once you don't get an error message and it starts adding a lot of files (A at the beginning of each line).
If you are not sure which version is the latest BI Server, just type this URL in your web browser:
http://source.pentaho.org/svnroot/bi-platform-v2/branches/

Create build.properties

An example of a build.properties file you can find here. Make sure that for Windows you use double backslashes in your paths!

#####################################
## GENERIC PROPERTIES
######################################

javac.path = D:\\Program Files\\Java\\jdk1.6.0_21\\bin\\

# Solution path. Required for compile time
solution.path = D:\\Pentaho\\CBF\\project-tutorial\\solution\\


# Solution path required for runtime. Defaults to the above value but can be different if we're
# deploying to another place. Should be used in WEB-INF/web.xml in the solution-path parameter
solution.deploy.path = D:\\Pentaho\\CBF\\project-tutorial\\solution\\

#accepted values: tomcat or jboss
server.name = tomcat

# Tomcat 5.5 path:
tomcat.path = D:\\Pentaho\\apache-tomcat-6.0.29\\

# Copy the sample solutions to our project directory? true | false
copy.pentaho.samples = true

BASE_URL = put your URL here

# Java options for the run command
java.opts = -Xmx512m -XX:MaxPermSize=512m -Xrunjdwp:transport=dt_socket,address=8765,server=y,suspend=n

#####################################
## PROJECT DIRECTORIES - The defaults usually work fine
######################################
pentaho.dir = bi-server-source\\3.5\\
pentaho.build.dir = target-build\\

#####################################
## DEPLOY OPTIONS
######################################
deploy.mode = rsync
deploy.args = -avz --exclude '.svn/' --exclude '*.log' --exclude 'work/' --exclude  'temp_user/' --exclude 'temp/' --exclude 'tmp/'
deploy.dest.server = user@host:path
deploy.dest.solution = user@host:path

Create patches
We will only go through one example here. Please prepare all other files that need changes in a similar fashion.

Example: 

Copy web.xml from pentaho/bi-platform-appserver/webapps/pentaho/WEB-INF/web.xml to project-client/patches/target-dist/server/webapps/pentaho/WEB-INF/web.xml
Inside of this file, tokens can be placed that will be set by the CBF ant script.  See the example snippet of web.xml bellow.

        <context-param>
                <param-name>solution-path</param-name>
                <param-value>@solution.deploy.path@</param-value>
        </context-param>
        <context-param>
                <param-name>base-url</param-name>
                <param-value>@BASE_URL@</param-value>
        </context-param>

So basically, the files stays exactly the same, you only replace some values by tokens (highlighted in red).


The tokens @solution.deploy.path@ and @BASE_URL@ are defined in the project-client/config/build.properties or project-client/config/build-client.properties files and will be replaced by the CBF ant script and the new revised web.xml with the replaced tokens will be copied to the top level directory (In this example CBF).


Start Hypersonic DB

Go to D:\Pentaho\hsqldb-2.0.0\hsqldb\bin and start runServer.bat.

Create the build

In your command line tool go to the CBF folder and issue ant -Dproject=tutorial -p, which will show you all the parameters that you can pass to the build.xml. Find an extract below:

D:\Pentaho\CBF>ant -Dproject=tutorial -p
Buildfile: D:\Pentaho\CBF\build.xml
     [echo] --------------------------------------------------------------
     [echo] --------------------------------------------------------------
     [echo] ------       CBF - Community Build Framework           -------
     [echo] ------                 Version: 3.5.0                  -------
     [echo] ------ Author: Pedro Alves (pedro.alves@webdetails.pt) -------
     [echo] --------------------------------------------------------------
     [echo] --------------------------------------------------------------
     [echo]
     [echo]                          SETTINGS:
     [echo]
     [echo]    Project:         ukint
     [echo]    Environment:     build.properties
     [echo]    Config File:     project-tutorial/config/build.properties
     [echo]    Server:          tomcat
     [echo] --------------------------------------------------------------
     [echo] --------------------------------------------------------------
Pentaho BI Platform build helper..
Main targets:

 all              Compiles and builds the entire project
 clean            Cleans the solution
 copy-finish      Copy target files
 copy-init        Copy project files

Now issue the following:

ant -Dproject=tutorial -Denv=dev dist-clean all run

The command will first load build.properties and then because of the -Denv=dev, the command will load build-dev.properties. As mentioned, you don't have to have a build-env.properties file, it's optional. If you don't you don't have this file, you just run the following:

ant -Dproject=tutorial dist-clean all run

dist-clean will delete any previous buids.

Ubuntu (Linux) Setup

  1. Open terminal (Applications > Accessories > Terminal).
  2. Issue javac -version to see if you have a recent JDK installed.

The next section describes the setup for users who want to avoid working with command line as much as possible. Users familiar with the Terminal, please jump to "Using Terminal". 

Using Applications > Ubuntu Software Center

For users that are not familiar with the command line interface, this is the way to go ... (although we still have to use the Terminal a bit)
  1. In Ubuntu Software Center search for "openjdk-6-jdk" and click to install it [OPEN]
  2. search for Ant, "Java based built tool like Make, Ant" will show up. Click the install button.
  3. Search for subversion. "Advanced version control system, subversion" will shop up. Click the install button. This package includes the subversion client (svn), tools to create a Subversion repository (svnadmin) and to make a repository available over a network (svnserve). The fastest way now to progress is to use the Terminal. Follow these instructions, skip the first step as we already installed subversion.  Your svn repository should then reside in /usr/local/svn/repos.
  4. Search for subversion and choose one of the clients, like Subcommander
  5. Search for Tomcat. At the time of this writing, Tomcat 6 was the current version. Install it.
  6. Download a hypersonic database from here. Go to Place > Home Folder, click File > Create Folder and name it "Pentaho". Unzip the HSQLDB file in the Downloads folder and move the unzipped folder to the recently created "Pentaho" folder. [/home/diethardsteiner/Pentaho]
  7. You can also download MySQL if you want (some install info you can find here). We will not cover setting up the environment with MySQL here, but you can later on progress to include MySQL in your environment.
  8. Still being in the "Pentaho" folder, go to File > Create Folder and name it "CBF". Download CBF's build.xml form the CBF Wiki page, extract it and move it to the recently created "CBF" folder. Mark the file, hit F2 and rename it to build.xml.  [/home/diethardsteiner/Pentaho/CBF]

Using Terminal

Note: If you followed the instructions of "Using Applications > Ubuntu Software Center", then you can ignore this section.
  1. Install Java: sudo apt-get install openjdk-6-jdk
  1. Install ant: sudo apt-get install ant 
  2. Install subversion: sudo apt-get install subversion. A good documentation on how to set up subversion on Ubuntu can be found here. Follow these instructions. Your svn repository should then reside in /usr/local/svn/repos. Additional info can be found here.
  3. Install Tomcat: sudo apt-get install tomcat6
  4. Download a hypersonic database from here. Create a folder: mkdir $Home/diethardsteiner/Pentaho. Move the folder in this directory. 

Create the .ant Directory

Ant is located in usr/share/ant. Follow the instructions mentioned in the Windows section: click here.

XMLTask.jar

Download XMLTask.jar from here and move the jar file to /home/<username>/.ant/lib/. ".ant" is a hidden folder, hence you normally wont see it if you go to Places > Home Folder. Press "CTRL+H" to temporarily see the hidden folders or go to Edit > Preferences and in the "View" tab tag "Show hidden and backup files" to permanently see the hidden files.

CBF Build XML

See here

Download a BI Server Build

See here

Create build.properties

See here

Create patches

See here

Mac OS X Setup

I won't go through the procedure here again, just some special notes:

Subversion is included in Mac OS X Leopard and Snow Leopard. Have a look at this tutorial on how to get it running.

Mac specific SVN Clients: Cornerstone and SCPluging


Read More
Posted in | No comments

Kettle: Handling Dates with Regular Expression

Posted on 10:47 by Unknown

Kettle: Handling Dates with Regular Expression

This is the second tutorial that focuses on using regular expressions with Pentaho Kettle (PDI). This is again a demonstration on how powerful regular expression acutally are.

In this example we are dealing with a simplified data set containing date values. The problem is, that the date doesn't have a standard format. We have following values:

date
2010/1/2
2010/01/2
2010/1/02
2010/01/02
20100102

We assume for now, that all follow at least this basic standard: year, month, day. Now, we need to somehow generate a standard date in the format yyyy-MM-dd using the value from the date field as input.

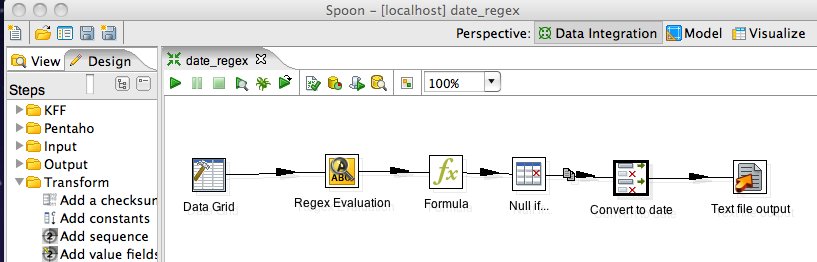
Regular expressions are of much help here, as we can use the concept of capturing groups. Capturing groups will allow us to retrieve the year, month and day parts of the date easily, then we build together our final date (we want it in the yyyy-MM-dd format). Now let's see how this is done:
For our convenience, we use the data grid step to store our dummy dates for testing:

Now we are ready to go ahead and work on our regular expression. Insert the Regex Evaluation step from the Scripting folder and configure it as shown in the screenshot below:
On the content tab make sure that you select "Permit whitespace and comments in pattern". Now let's have a look at the regular expression:

  1. The string must start with 4 numbers. We enclose the definition by brackets to create the first capturing group. Note: I added #1. This is a comment and helps to mark the capturing groups for easy reference.
  2. Next we say that a dash can follow or not. This is our 2nd capturing group.
  3. I guess you get the idea for the remaining capturing groups. In the end we make sure that nothing else follows, hence we use the dollar sign.
Once we have created our capturing groups, we can reference them in the "Capture Group Fields". First make sure that "Create fields from capture" is activated. Then fill out the fields below as shown.

This step will basically get the year, month and day parts. 

Now we have to build the date together. We can use the formula step therefore:

First we check if a value exists, if not, we set the field to 0s. In case a value exists, we check if the month and day part have a leading zero, if not, we add it. Finally, we build the whole date string together.

Now, it is not a very good approach to save non standard 0000-00-00 dates in the database (i.e.), hence we use the "Null if ..." step to set records with 0000-00-00 date to null:


The final step left to do is to convert the string to a proper date. You can do this with the "Select values" step. Go to the Meta-data tab and fill it out as shown below:
Save the transformation and run it. Now let's have a look at the output:

You can see that it is quite simple to handle non standardized data with regular expressions. You can download the transformation here.
Read More
Posted in | No comments
Newer Posts Older Posts Home
Subscribe to: Posts (Atom)

Popular Posts

  • Pentaho Data Integration: Remote execution with Carte
    Pentaho Data Integration: Remote execution with Carte Tutorial Details Software: PDI/Kettle 4.1 (download  here ), installed on your PC and ...
  • Pentaho Data Integration: Scheduling and command line arguments
    Pentaho Data Integration (Kettle): Command line arguments and scheduling Tutorial Details Software: PDI/Kettle 4.1 (download here ), MySQL S...
  • Pentaho PostgreSQL Bulk Loader: How to fix a Unicode error
    When using the Pentaho PostgreSQL Bulk Loader step, you might come across following error message in the log: INFO  26-08 13:04:07,005 - Po...
  • Pentaho Data Integration: Best practice solutions for working wit
    Pentaho Data Integration: Best practice solutions for working with huge data sets Assign enough memory Open pan.sh and kitchen.sh (and spo...
  • Using Parameters in Pentaho Report Designer
    Using Parameters in Pentaho Report Designer Introduction How to define a parameter Additional info about the new parameter dialog Hidden Par...
  • Pentaho Data Integration and Infinidb Series: Bulk Upload
    Pentaho Data Integration and InfiniDB Series: Bulk Upload Introduction Prepare Tables Using mainly Kettle steps Check if file exists Setup I...
  • Using regular expressions with Pentah...
    Using regular expressions with Pentaho Data Integration (Kettle) There are quite some transformations steps that allow you to work with regu...
  • Pentaho Kettle Parameters and Variables: Tips and Tricks
    Pentaho Kettle Parameters and Variables: Tips and Tricks This blog post is not intended to be a formal introduction to using parameters and ...
  • PDI: Full Outer Joins
    Pentaho Data Integration: Full Outer Joins Creating full outer joins in Pentaho Data Integartion (PDI aka Kettle) is a fairly straight forwa...
  • Pentaho Metadata Editor: Joining two fact tables
    Pentaho Metadata Model: Joining two fact tables This tutorial was possible with the help of Will Gorman , Vice President of Engineering at P...

Categories

  • "Bulk Loader"
  • "Bulk Loading"
  • "Hadoop"
  • "Kettle"
  • "Pentaho Book"
  • "Pentaho Data Integration"
  • "Pentaho Kettle"
  • "Pentaho Report Designer MDX MQL JDBC Parameters How To"
  • "Pentaho Report Designer MDX Parameters"
  • "Pentaho Report Designer MQL Parameters"
  • "Pentaho Report Designer Parmaters"
  • "Pentaho Report Designer"
  • "Pentaho Reporting 3.5 for Java Developers"
  • "Pentaho Reporting Book"
  • "Routing"
  • "Schema Workbench"
  • "Testing"
  • "Unicode"
  • "Unit testing"
  • "UTF8"
  • Agile development
  • automated testing
  • Big Data
  • Book Review
  • C-Tools
  • CBF
  • Clustered transformation
  • Command Line Arguments
  • Community Build Framework
  • D3JS
  • Dashboarding
  • Data Integration
  • Data Warehouse
  • Database Change Management
  • Database Version Control
  • Date Dimension
  • DBFit
  • ETL
  • ETLFit
  • Federated database
  • Google Charts
  • Google Visualization API
  • Hadoop
  • HTML5
  • iReport
  • JasperReports
  • JasperSoft
  • JasperStudio
  • Kettle
  • Kimball
  • Loop
  • Master data management
  • Metadata
  • Metedata editor
  • Mondrian
  • multidimensional modeling
  • OLAP
  • Open Source
  • Parameter
  • Parameters
  • Pentaho
  • Pentaho BI Server
  • Pentaho Data Integration
  • Pentaho Data Integration 4 Cookbook
  • Pentaho Kettle
  • Pentaho Metadata Editor Tutorial
  • Pentaho Report Designer
  • PostgreSQL
  • PRD
  • Report Layout
  • REST
  • Routing
  • Saiku
  • Scheduling
  • Slowly Changing Dimension
  • Sqitch
  • SVG
  • Talend
  • Talend MDM
  • Talend Open Studio
  • Tutorial
  • Variable
  • Web service
  • Xactions

Blog Archive

  • ▼  2013 (24)
    • ▼  December (2)
      • Pentaho 5.0 Reporting by Example: Beginner’s Guide...
      • Going Agile: Test your Pentaho ETL transformations...
    • ►  November (3)
    • ►  October (2)
    • ►  September (1)
    • ►  August (3)
    • ►  July (2)
    • ►  June (1)
    • ►  May (2)
    • ►  April (1)
    • ►  March (3)
    • ►  February (1)
    • ►  January (3)
  • ►  2012 (20)
    • ►  November (3)
    • ►  October (3)
    • ►  August (1)
    • ►  June (1)
    • ►  April (1)
    • ►  March (3)
    • ►  February (5)
    • ►  January (3)
  • ►  2011 (19)
    • ►  November (3)
    • ►  July (2)
    • ►  June (1)
    • ►  May (4)
    • ►  April (2)
    • ►  March (1)
    • ►  February (3)
    • ►  January (3)
  • ►  2010 (17)
    • ►  December (1)
    • ►  November (6)
    • ►  September (1)
    • ►  August (1)
    • ►  June (2)
    • ►  May (1)
    • ►  April (3)
    • ►  February (1)
    • ►  January (1)
  • ►  2009 (18)
    • ►  December (3)
    • ►  November (1)
    • ►  October (5)
    • ►  September (7)
    • ►  July (2)
Powered by Blogger.

About Me

Unknown
View my complete profile