Community Server

  • Subscribe to our RSS feed.
  • Twitter
  • StumbleUpon
  • Reddit
  • Facebook
  • Digg

Saturday, 7 May 2011

Pentaho Data Integration: Supplying Variables to Shell Scripts

Posted on 15:05 by Unknown
Pentaho Data Integration (Kettle): Supplying Kettle Variables to Shell Scripts

Tutorial Details
  • Software: PDI/Kettle 4.1 (download here)
  • Knowledge: Intermediate (To follow this tutorial you should have good knowledge of the software and hence not every single step will be described)
  • OS: Linux or Mac OS X
  • Tutorial files can be downloaded here

  1. A simple example
  2. Kettle / Infinidb Series: Using JDNI details with colxml

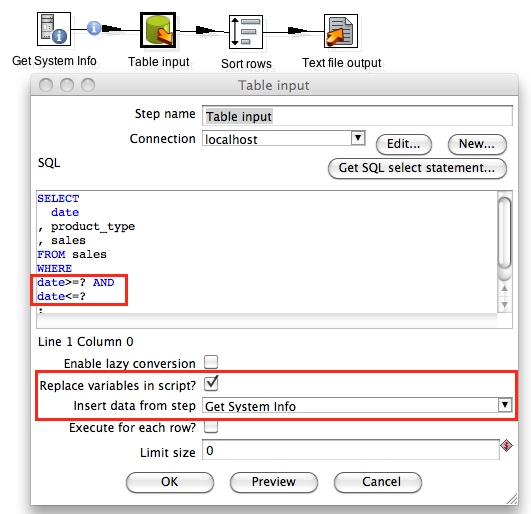
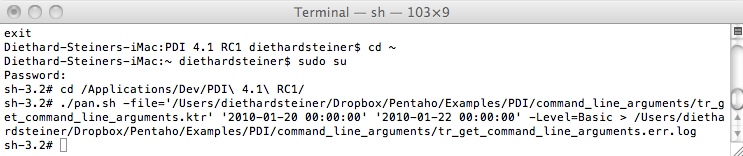
Last time we had a look at Supplying command line arguments to Kettle. This time we take a look at supplying Kettle variables to the command line or shell scripts. 

We will start this tutorial with a very general example (so that everybody can set it up) and in the second of half we will focus on a quite specific implementation.

Before we start, we should evaluate the situation. With shell scripts comes huge power in regards to what you can achieve with it. It's easy to fall into temptation and make use of this power, but is it to the benefit of your ETL process?

My advice is to do as much as possible with the dedicated transformation steps and job entries (file and folder management, etc). The reasons are the following (to mention some of the most important ones):
  • Steps are in most cases OS independent. Shell scripts are OS dependent.
  • Designing everything within one application (how easy is it to understand what each dedicated step does in contrast to writing custom code)
  • Easier maintenance

Hence, use the shell job entry only in situation when Kettle doesn't offer the functionality as a step/job entry. 

A simple example

The intention of this example is that you can set it up easily and quickly learn how to pass on variables to a shell script. I strongly advice not to use this example in your real world ETL job but to use the dedicated Kettle job entry instead.

Keeping this in mind, we will create a transformation that supplies a folder name to a shell script and the shell script will then create a folder with exactly this name. 

Now there are two ways to specify a script for the "Execute a shell script" job entry. One way is to insert the script directly in the job entry properties, but this approach doesn't allow you to specify any variables. To use variables, you have to create a dedicated shell file and reference it in the job entry properties.

  1. Open Spoon (Kettle) and create a new job
  2. Save the job as jb_supply_var_to_shell_script_simple in a convenient folder.
  3. Open the Terminal and navigate to the same folder. Create a file called create_folder.sh using vi:
    $ vi create_folder.sh

    Note: If you create the shell file on a Windows environment and then copy it over to a Linux environment, make sure that you first get rid of the control characters in the file. One utility which can help you with this is dos2unix. If you don't have it installed, use your favourite package manager (i.e. $ yum install dos2unix) to install it. Once it is installed, run: 
    dos2unix create_folder.sh

  4. Insert the following (Press i to insert):
    mkdir $1
    $1 references the first parameter that is supplied via the command line to the shell script.
  5. Make the file executable:
    $ chmod a+x create_folder.sh
  6. Go back to Kettle and drag and drop a Start and Execute a shell script job entry onto the canvas
  7. Create a hop between these job entries
  8. We will now set up the folder name variable and specify a default value. Press CTRL+J to call the Job Properties dialog. Click on the Parameters tab and specify VAR_FOLDER_NAME as a parameter as test as default value. Click OK.

  9. Double click on the Execute a shell script job entry

  10. Click on the Script file name input field; then press CTRL+Space and choose the internal job filename directory. Click Browse and choose the shell file we just created. Note: Mac OS X users - the short cut doesn't work, because CTRL+Space is reserved for Spotlight. Either you disable the shortcut or you manually write the variable name.
  11. For the Working directory specify the internal job filename directory variable as well.
  12. In the Fields section supply the ${VAR_FOLDER_NAME} variable.
  13. Save the job and execute it. If you take a look at your folder, you will see that a new subfolder named "test" was created.


Kettle / InfiniDB Series: Using Kettle JDNI details with colxml

Although I make an attempt to provide some basic information below, I recommend reading my tutorial Pentaho Data Integration and Infinidb Series: Bulk Upload to get some more information about Infinidb.This will help understand this section better. 

InfiniDB is one of the more popular column oriented database. Currently Kettle doesn't have a dedicated Infinidb bulk upload step. The fastest way to load data into InfiniDB is to use their command line utility called cpimport. Cpimport only accepts job information in the form an xml file, which can be generated with colxml utility . Both cpimport and colxml reside in a sub-directory of the main InfiniDB installation and are usually only executable by the root user. In a nutshell, you tell colxml in which database (optionally table, what kind of delimiter, etc) you want your data file to be loaded and it spits out a nicely formated xml file which cpimport uses to process the data.
Now all this is an ideal candidate for the Execute a shell script job entry, because Kettle doesn't provide this functionality out of the box (yet).

Now that we all know how the process works, let's focus on our ETL process. If somebody wants to follow this section, you can download an open source version of Infinidb here (you can find detailed installation instructions on the same website).

If you are working with a lot of ETL files it is recommended to use JNDI connection details to make the maintenance easier. So instead of specifying all the database connection details for every step that requires them, we can simple store all our database connection details in the simple-jndi/jdbc.properties file, assign a name to each connection and reference this name in the Kettle step. So in the case that the database connection details change, you only have to change them in one place (namely the jdbc.properties file) and not in all Kettle steps. In our example, we will follow this approach. 

The only tricky bit here is that colxml requires the database name. Kettle has actually a dedicated Properties Input step (thanks to Slawo for pointing this out) which allows you to read the jdbc.properties file and with a bit of string manipulation we can extract the database name.

For the example below to work you have create a table called fact_impression on a Infinidb database, have a working transformation that outputs a pipe separated file called fact_impression.tbl which we can bulk upload to the fact_impression table. Moreover, you have to define the database connection details in {KETTLE_ROOT}/simple-jndi/jdbc.properties.

Now let's get started. I will only describe the main points. Please find below an overview of the job:
The flow is as follows:
  1. We provide two parameters to this job: ${VAR_DWH} which is the JNDI name we want to use for our ETL job and ${VAR_ETL_FILE} which is unsurprisingly the name of the main ETL transformation that we want to use in this job. Press CTRL+J to see the job properties. Click on the Parameters tab to see these defined parameters. The idea is that these parameters are supplied on the command line when kitchen.sh is called (see Supplying command line arguments to Kettle for more details).
  2. The tr_get_jndi_properties transformation reads the jdbc.properties file and extracts all the database connection details for the JDNI name defined in ${VAR_DWH}. To achieve this we use some regular expressions (this technique is described in my Using Regular Expressions with Pentaho Data Integration tutorial). Note that at the end of this transformation we define the database name as a variable (dwh_database).

  3. All data files for bulk upload have to be stored in /usr/local/Calpont/data/bulk/data/import. In this case we are a bit cautious and delete any old *.tbl file in this directory.
  4. We execute our main ETL transformation (the filename is defined in ${VAR_ETL_FILE}). This transformation has to output a CSV file with the name fact_impression.tbl into /usr/local/Calpont/data/bulk/data/import. Make sure it is pipe delimited.
  5. The next step prepares the Infinidb job file. The infinidb_colxml.sh Shell script job entry calls the external shell file infinidb_colxml.sh. This shell file includes the following:

    rm -rf  /usr/local/Calpont/data/bulk/job/Job_9991.xml
    [ -f /usr/local/Calpont/data/bulk/data/import/fact_impression.tbl ] &&  /usr/local/Calpont/bin/colxml $1 -j 9991 -t fact_impression


    This shell script basically deletes an existing Infinidb job file and if fact_impression.tbl (this is the CSV output file of our main transformation) exists it will create a new Infinidb job file. Please find all the details about this in my tutorial Pentaho Data Integration and Infinidb Series: Bulk Upload. As you can see we define an argument $1 (highlighted in yellow in the above shell script). $1 will basically accept the first parameter supplied by Kettle, which is dwh_database. Hence the order in which you specify the arguments in the Shell script job entry is really important.
    Note that we define dwh_database variable as an argument in the Shell script job entry.
  6. The Load Tables Shell script step calls cpimport and initiates a bulk upload.
  7. The last step is not really necessary, but here we delete all data files again in the bulk upload directory.

As you can see, Kettle really offers powerful functionality. The important point is to keep in mind to only use shell scripts in cases when Kettle doesn't provide a dedicated step or job entry.

If you want to learn more about Shell scripting, consider this free book.

Read More
Posted in | No comments

Friday, 15 April 2011

Pentaho Data Integration: Excel Writer Step (Plugin)

Posted on 12:58 by Unknown
Pentaho Data Integration (Kettle): Excel Writer Step

One great thing about Kettle is that everybody with Java coding skills can just write a plugin for it and hence extend its functionality. One plugin that I want to highlight is Slawo's Excel Writer Step which in my opinion is extremely useful. Why? 

  • Quick and easy report creation: Design your report in Excel and tell the Excel Writer step where to place the data. Here's a really cool feature: You can tell the step in which cell to place the data. So you can even use the step several times to write to different areas within the same spreadsheet. Learn how to do this be reading Slawo's excellent tutorial.
  • Report bursting can be now set up within Kettle: Imagine a scenario where each country manager only receives a report with data related to their country. You can set up a process now in Kettle that takes care of this.
  • There is always a business user who loves Excel above everything, even if you have the fanciest BI website. You can output reports to Excel using Pentaho Report Designer, but in this case the charts will only be images. If it is required to have native Excel charts, the Kettle Excel plugin in your best friend.

You can download the Excel Writer Plugin from here.
Read More
Posted in | No comments

SQLPower Wabit

Posted on 12:52 by Unknown

SQLPower Wabit: Is it the one-reporting-tool-does-it-all solution?


There are quite different kinds of reports: ranging from dashboard/high level summary reports to very granular data  tables spanning 20 or so pages. 

As a report designer you usually have to satisfy various clients' needs: The Operations guy wants have a very detailed report, the CEO a high level summary/dashboard style report and so on. 

Now Pentaho Report Designer (PRD) is an excellent tool with millions of formatting options etc, but it is more geared towards a very granular/tabular output. If you want to create a dashboard style report, you have to use sub reports. You cannot currently design sub reports within the same window, which is quite inconvenient especially for layouting purposes. Plus every new report that you create has by default the reporting sections required for a table output style (report header, details, report footer) ... so what am I supposed to do if I only want to use one chart? Do I place it in the header, details or footer? 
I guess you know where I am getting to: Why not start with a blank canvas and let the user decide what reporting object(s) they want to use? 
As much as I like the Pentaho Report Designer for very granular reports, I still find it unexplainable why there is no functionality that allows dashboard style reports (it's more of a user interface problem I guess). I am not talking about interactive dashboards like the ones offered by Pentaho CDF (Community Dashboard Framework), just a combination of static charts, summary tables, crosstabs, etc. 

While CDF has really great functionality, it's not possible to email the dashboard report (imagine a scenario when the CEO is on holidays and wants his high level summary to be delivered by email). 

I had a quick 5 minutes look at iReport which seems to have the same shortcomings as PRD. So all of them were not really what I was looking for - the one-reporting-tool-does-it-all solution. I kept on search and found SQLPOWER Wabit:

Reading the specs on their website, this just seemed to be the tool I was looking for. I installed it and within 5 minutes I had a dashboard style report created without even reading a manual (which tells a lot about the UI). My report sourced data from Mondrian for a crosstab, and from a MySQL DB for a chart and a summary table. I ddin't have to be bother by using subreports, I could just place the required reporting objects on the canvas and I could use more than one data source as well for the report objects. Nice! Actually, very nice! 

Coming back to the initial question: Is it the one-reporting-tool-does-it-all solution? For now SQLPower doesn't seem to offer the millions of formatting options PDR and iReport have, but then it is only in version 1.3.4 and my report was quite nice looking for the 5 minutes I spend on it.

Overall, SQLPOWER Wabit seems to be a very promising product (did I mention that there is an open source version?). It even offers a visual interface to query OLAP cubes. You can download it from here and give it a test ride.

Read More
Posted in | No comments

Saturday, 19 March 2011

Pentaho Data Integration: Scheduling and command line arguments

Posted on 16:01 by Unknown

Pentaho Data Integration (Kettle): Command line arguments and scheduling

Tutorial Details

  • Software: PDI/Kettle 4.1 (download here), MySQL Server (download here)
  • Knowledge: Intermediate (To follow this tutorial you should have good knowledge of the software and hence not every single step will be described)
  • OS: Linux or Mac OS X
  • Tutorial files can be downloaded here


Approach to provide arguments to one step in a transformation
Approach to provide arguments to more transformations and jobs
Using named Parameters
Scheduling a job on Linux

Once you tested your transformations and jobs there comes the time when you have to schedule them. You want to have a certain amount of flexibility when executing your Pentaho Data Integration/Kettle jobs and transformations. This is where command line arguments come in quite handy. 

A quite common example is to provide the start and end date for a SQL query that imports the raw data. Kettle makes it very easy actually to set this up. 

Approach to provide arguments to one step in a transformation


If you just need the arguments for one step only, then you can use the Get System Info step and create a hop to your Database Input step.

We will be working with following data set:

Open your favourite SQL Client (and start your MySQL server if it is not running yet) and issue following SQL statements:


USE
test
;

DROP TABLE IF EXISTS
`sales`
;

CREATE TABLE
`sales`
(
`date` DATETIME,
`product_type` VARCHAR(45),
`sales` INT(255)
)
;

INSERT INTO
`sales`
VALUES
('2010-01-20 00:00:00','Shoes',234),
('2010-01-20 00:00:00','Cheese',456),
('2010-01-21 00:00:00','Shoes',256),
('2010-01-21 00:00:00','Cheese',156),
('2010-01-22 00:00:00','Shoes',535),
('2010-01-23 00:00:00','Cheese',433)
;


SELECT
*
FROM
`sales`
;


CREATE TABLE
`sales_staging`
(
`date` DATETIME,
`product_type` VARCHAR(45),
`sales` INT(255)
)
;

Our goal is to provide the start and end date arguments to our SQL query.

Now let's create our transformation:

  1. Open Kettle and create a new transformation
  2. Drag and drop a Get System Info step on the canvas. You can find it in the Input folder on the left hand side.
  3. Double click on it and populate the names column in the grid with start_date and end_date.
  4. For the type choose command line argument 1 and command line argument 2 respectively


Now add a Table input step and a Table output step (we keep it very simple). Create hops between all these steps in the order that they were mentioned.
Double Click on the Table Input step and populate the SQL field with the query shown below:

SELECT
date
, product_type
, sales
FROM sales
WHERE
date>=? AND
date<?
;

You can feed the start and end date from the Get System Info step to a Table Input step and use the start and end date in the WHERE clause of your SQL query (highlighted in yellow). The question marks will be replaced on execution by the start and end date (but make sure they are defined in this order in the Get System Info step). 

Make sure that you enable Replace variables in script? and choose the Get System Info step for Insert data from step. 

Define a New ... connection (Connection Name: Localhost, Connection Type: MySQL, Host Name: localhost, Database Name: test, Port Number: 3306, your user name and password).

Click OK. The hop between the Get System Info step and the Table Input step now also displays an info icon.


And this is all that you have to do: Your transformation now accepts command line arguments!

So now let's try to execute the transformation from the command line. Close all the files that we just created, then open your Terminal window.


My transformation is located in:
/Users/diethardsteiner/Dropbox/Pentaho/Examples/PDI/command_line_arguments/tr_get_command_line_arguments.ktr

To execute a transformation from the command line, we have to call pan.sh, which is located in my case in:

/Applications/Dev/PDI\ 4.1\ RC1/pan.sh

Use following approach to execute the transformation (replace the file paths by yours):

Change to the PDI directory:

cd /Applications/Dev/PDI\ 4.1\ RC1/

Use the super user and provide the password:

sudo su

Issue following command (replace yellow highlighted paths with your paths):

./pan.sh -file='/Users/diethardsteiner/Dropbox/Pentaho/Examples/PDI/command_line_arguments/tr_get_command_line_arguments.ktr' '2010-01-20 00:00:00' '2010-01-22 00:00:00' -Level=Basic > /Users/diethardsteiner/Dropbox/Pentaho/Examples/PDI/command_line_arguments/tr_get_command_line_arguments.err.log

Command line parameters (highlighted in red) have to be mentioned after the file argument. Mention them in the order that you expect them to be received in Kettle. The level argument (highlighted in blue) specifies the logging level. Following levels are available (from the most detailed one to the least detailed one): Rowlevel, Detailed, Debug, Basic, Minimal, Error, Nothing.

Pan accepts many more arguments, i.e. to connect to the repository. Please have a look at the Pan User Documentation for all the details.

Once the command is issued and you get no error message returned (check the error file), let's check the data that got exported to our output table:


As you can see from the screenshot above, only the data covering our specified timeframe got processed.

Approach to provide arguments to more transformations and jobs

If you plan to use the command line arguments in more than one step and/or more transformations, the important point is that you will have to do this in a separate transformation which has to be executed before the transformation(s) that require(s) these variables. Let’s call this transformation Set Variables.

The Set Variables transformation has two steps:

  • Get System Info: It allows you to define variables that are expected to come from the command line
  • Set Variables: This one will then set the variables for the execution within Kettle, so that you can use them in the next transformation that is specified in your job. 

Note: The command line arguments enter Kettle as a String. In some cases the variable is expected to be of a certain data type. Then you will have to use the Get Variable step in a succeeding transformation to define the specific data type for each variable.

There is no additional adjustment needed. Do not fill out the Parameters tab in the Transformation properties or Job properties with these variables!

We can now change our main transformation to make use of these variables.

A typical scenario would be the following: Our ETL process populates a data warehouse (DWH). Before we insert the compiled data into the DWH, we want to make sure that the same data doesn't already exist in it. Hence we decide, that we just want to execute a delete statement that clears the way before we add the newly compiled data.

Our ETL job will do this:

  1. Initialise the variables that are used through the job (done in a dedicated transformation)
  2. Delete any existing DWH entries for the same time period (done in a SQL job entry)
  3. Main ETL transformation

Let's start:


  1. Create a new transformation and call it tr_set_variables.ktr
  2. Drag and drop a Get System Info step on the canvas. You can find it in the Input folder on the left hand side.
  3. Double click on it and populate the names column in the grid with start_date and end_date.
  4. For the type choose command line argument 1 and command line argument 2 respectively
  5. Next drag and drop the Set Variables step from the Job Folder onto the canvas and create a hop from the Get System Info step to this one.
  6. Double click the Set Variables step and click on Get Fields:
    Clicking Get Fields will automatically define all input fields as variables. If you don't need all, just delete the relevant rows. In our case we want to keep all of them. Kettle will also automatically capitalize the variable names. As I want to avoid any confusion later on, I explicitly prefix my variables in Kettle with VAR_. You can also define scope type and set a default value.

We have now create a transformation that accepts command line arguments and sets them as variables for the whole job.  

Next, let's create the main ETL transformation:

  1. Open tr_get_command_line_arguments (which we created earlier on) and save it as tr_populate_staging_tables.  
  2. Delete the Get System Info step. We don't need this step any more as we define the variables already in tr_set_variables.
  3. Double click the Table input step. As our variable can be referenced by names, we have to replace the question marks (?) with our variable names like this:

    SELECT
      date
    , product_type
    , sales
    FROM sales
    WHERE
    date>="${VAR_START_DATE}" AND
    date<"${VAR_END_DATE}"
    ;
    The variables are now enclosed by quotation marks as we want the date to be treated as string.
  4. Click Ok and save the transformation.
As we have our transformations finished now, we can start creating a job that executes our transformations in a defined order (We will keep this job rather simple. I suggest adding error handling):
  1. Create a new job and name it jb_populate_staging_tables.
  2. Insert following job entries in the order specified and connect them with hops:

  1. Start entry
  2. Tranformation entry: Double click on it and choose tr_set_variables.ktr as the Transformation filename.
  3. From the Script Folder choose the Execute SQL script ... job entry: Define a New ... connection (Connection Name: Localhost, Connection Type: MySQL, Host Name: localhost, Database Name: test, Port Number: 3306, your user name and password). Tick Use variable substitution?. Insert following query:

    DELETE FROM
    sales_staging
    WHERE
    date>="${VAR_START_DATE}" AND
    date<"${VAR_END_DATE}"
    ;
    Pay attention to the where clause: The variables are now enclosed by quotation marks as we want the date to be treated as string. Also note that the date restriction is exactly the same as the one we use for the raw data import.
  4. Transformation entry: Double click on it and choose tr_populate_staging_tables.ktr as the Transformation filename.
So now let's try to execute the transformation from the command line. Close all the files that we just created, then open your Terminal window.


My job is located in:
/Users/diethardsteiner/Dropbox/Pentaho/Examples/PDI/command_line_arguments/jb_populate_staging_tables.kjb

To execute a job from the command line, we have to call kitchen.sh, which is located in my case in:

/Applications/Dev/PDI\ 4.1\ RC1/pan.sh

Use following approach to execute the transformation (replace the file paths by yours):

Change to the PDI directory:

cd /Applications/Dev/PDI\ 4.1\ RC1/

Use the super user and provide the password:

sudo su

Issue following command (replace yellow highlighted paths with your paths):

./kitchen.sh -file='/Users/diethardsteiner/Dropbox/Pentaho/Examples/PDI/command_line_arguments/jb_populate_staging_tables.kjb' '2010-01-20 00:00:00' '2010-01-22 00:00:00' -Level=Basic > /Users/diethardsteiner/Dropbox/Pentaho/Examples/PDI/command_line_arguments/jb_populate_staging_tables.err.log

Command line parameters (highlighted in red) have to be mentioned after the file argument. Mention them in the order that you expect them to be received in Kettle. The level argument (highlighted in blue) specifies the logging level. Following levels are available (from the most detailed one to the least detailed one): Rowlevel, Detailed, Debug, Basic, Minimal, Error, Nothing.

Kitchen accepts many more arguments, i.e. to connect to the repository. Please have a look at the Kitchen User Documentation for all the details.

Inspect the error log to see if the job ran successfully. Then have a look at the staging table to see if the data got imported.

Using named Parameters

Named parameters are special in the sense that they are explicitly named command line arguments. If you pass on a lot of arguments to your Kettle job or transformation, it might help to assign those values to an explicitly named parameter. 

Named Parameters have following advantages:

  • On the command line you assign the value directly to a parameter, hence there is zero chance of a mix-up.
  • A default value can be defined for a named parameter
  • A description can be provided for a named parameter
  • No need for an additional transformation that sets the variables for the job

Let's reuse the job that we created in the previous example:


  1. Open jb_populate_staging_tables.kjb and save it as tr_populate_staging_tables_using_named_params.kjb.
  2. Delete the Set Variables job entry and create a hub from the Start to the Execute SQL script entry.
  3. Click CTRL+J to call the Job properties dialog.
  4. Click on the Parameters tab and specify the parameters like this:
    In our case we don't define a default value. The reason for this is that we don't want to import any raw data in case there is no start and end date defined.
  5. Click Ok and save the job.


Our job is completely set up. Let's execute it on the command line:

./kitchen.sh -file='/Users/diethardsteiner/Dropbox/Pentaho/Examples/PDI/command_line_arguments/jb_populate_staging_tables_using_named_params.kjb' -param:VAR_START_DATE='2010-01-20 00:00:00' -param:VAR_END_DATE='2010-01-22 00:00:00' -Level=Basic > /Users/diethardsteiner/Dropbox/Pentaho/Examples/PDI/command_line_arguments/jb_populate_staging_tables_using_named_params.err.log

I described the various kitchen arguments in the previous section, so I won't repeat it here. The only difference here are the named parameters (highlighted in yellow).

Inspect the error log to see if the job ran successfully. Then have a look at the staging table to see if the data got imported.

As you can see, named parameters are the crème de la crème!

Scheduling a job on Linux

Now that we have quite intensively explored the possibilites of passing command line arguments to Kettle, it's time to have a look at scheduling:

On Linux crontab is a popular utility that allows to schedule processes. I will not explain crontab here, if you are new to it and want to find out more about it, have a look here. 

Our plan is to schedule a job to run every day at 23:00. We pass on two command line arguments to this job: the start and the end datetime. It's required that this job imports each time the raw data of the last two days (23:00 to 23:00). To calculate the start and end date for the raw data processing we will write a shell script. The plan is to schedule this shell script using crontab.

You can edit the crontab by issuing following command:

crontab -e 

This will display any scheduled processes. If you are familiar with vi, you can use the same commands here to edit and save. Click i to insert the following:

00 23 * * * /jb_populate_staging_tables_daily.sh

Press ESC followed by :wq to save and exit crontab.

Navigate to the folder where you saved all the jobs and transformations. Create this shell script with vi and name it jb_populate_staging_tables_daily.sh:

cd /Applications/Dev/PDI\ 4.1\ RC1;./kitchen.sh -file='/Users/diethardsteiner/Dropbox/Pentaho/Examples/PDI/command_line_arguments/jb_populate_staging_tables.kjb' "`date --date='2 days ago' '+%Y-%m-%d 23:00:00'`" "`date --date='1 day ago' '+%Y-%m-%d 23:00:00'`" -Level=Basic > populate_staging_tables_daily.err.log

Note: We enclosed our arguments with double quotes. We used enclosing back ticks to indicate that a shell command has to be executed. There is also a blank in our argument, which we enclosed by using single quotes (otherwise Linux is expecting another argument).

Our job is now scheduled. Make sure that you check after the first run for any errors.

In this article you learnt about creating flexible jobs and transformations by using command line arguments. We also had a quick look at scheduling your jobs. I hope this article demonstrated that it is quite easy to set this up.
Read More
Posted in | No comments
Newer Posts Older Posts Home
Subscribe to: Posts (Atom)

Popular Posts

  • Pentaho Kettle Parameters and Variables: Tips and Tricks
    Pentaho Kettle Parameters and Variables: Tips and Tricks This blog post is not intended to be a formal introduction to using parameters and ...
  • Using Parameters in Pentaho Report Designer
    Using Parameters in Pentaho Report Designer Introduction How to define a parameter Additional info about the new parameter dialog Hidden Par...
  • Pentaho Data Integration: Scheduling and command line arguments
    Pentaho Data Integration (Kettle): Command line arguments and scheduling Tutorial Details Software: PDI/Kettle 4.1 (download here ), MySQL S...
  • Jaspersoft iReport: How to pass a parameter to a sub-dataset
    Jaspersoft iReport: How to pass a parameter to a sub-dataset Let’s say our main report is grouped by continent and the details band holds sa...
  • Pentaho Data Integration and Infinidb Series: Bulk Upload
    Pentaho Data Integration and InfiniDB Series: Bulk Upload Introduction Prepare Tables Using mainly Kettle steps Check if file exists Setup I...
  • Using regular expressions with Pentah...
    Using regular expressions with Pentaho Data Integration (Kettle) There are quite some transformations steps that allow you to work with regu...
  • Pentaho Data Integration: Remote execution with Carte
    Pentaho Data Integration: Remote execution with Carte Tutorial Details Software: PDI/Kettle 4.1 (download  here ), installed on your PC and ...
  • How to create a loop in Pentaho Kettle
    I finished my first ever video tutorial! This video will demonstrate you how easy it is to create a loop in Pentaho Kettle. Enjoy!
  • How to Set Up Pentaho Community Build Framework
    How to Set Up Pentaho Community Build Framework  Introduction Pentaho BI Server Setup with CBF Java, Tomcat and Ant Set environment variable...
  • Metadata Driven ETL and Reporting
    Metadata Driven ETL and Reporting with Pentaho Data Integration and Report Designer Tutorial Details  Software : If PDI Kettle 4.2 GA and PR...

Categories

  • "Bulk Loader"
  • "Bulk Loading"
  • "Hadoop"
  • "Kettle"
  • "Pentaho Book"
  • "Pentaho Data Integration"
  • "Pentaho Kettle"
  • "Pentaho Report Designer MDX MQL JDBC Parameters How To"
  • "Pentaho Report Designer MDX Parameters"
  • "Pentaho Report Designer MQL Parameters"
  • "Pentaho Report Designer Parmaters"
  • "Pentaho Report Designer"
  • "Pentaho Reporting 3.5 for Java Developers"
  • "Pentaho Reporting Book"
  • "Routing"
  • "Schema Workbench"
  • "Testing"
  • "Unicode"
  • "Unit testing"
  • "UTF8"
  • Agile development
  • automated testing
  • Big Data
  • Book Review
  • C-Tools
  • CBF
  • Clustered transformation
  • Command Line Arguments
  • Community Build Framework
  • D3JS
  • Dashboarding
  • Data Integration
  • Data Warehouse
  • Database Change Management
  • Database Version Control
  • Date Dimension
  • DBFit
  • ETL
  • ETLFit
  • Federated database
  • Google Charts
  • Google Visualization API
  • Hadoop
  • HTML5
  • iReport
  • JasperReports
  • JasperSoft
  • JasperStudio
  • Kettle
  • Kimball
  • Loop
  • Master data management
  • Metadata
  • Metedata editor
  • Mondrian
  • multidimensional modeling
  • OLAP
  • Open Source
  • Parameter
  • Parameters
  • Pentaho
  • Pentaho BI Server
  • Pentaho Data Integration
  • Pentaho Data Integration 4 Cookbook
  • Pentaho Kettle
  • Pentaho Metadata Editor Tutorial
  • Pentaho Report Designer
  • PostgreSQL
  • PRD
  • Report Layout
  • REST
  • Routing
  • Saiku
  • Scheduling
  • Slowly Changing Dimension
  • Sqitch
  • SVG
  • Talend
  • Talend MDM
  • Talend Open Studio
  • Tutorial
  • Variable
  • Web service
  • Xactions

Blog Archive

  • ▼  2013 (24)
    • ▼  December (2)
      • Pentaho 5.0 Reporting by Example: Beginner’s Guide...
      • Going Agile: Test your Pentaho ETL transformations...
    • ►  November (3)
    • ►  October (2)
    • ►  September (1)
    • ►  August (3)
    • ►  July (2)
    • ►  June (1)
    • ►  May (2)
    • ►  April (1)
    • ►  March (3)
    • ►  February (1)
    • ►  January (3)
  • ►  2012 (20)
    • ►  November (3)
    • ►  October (3)
    • ►  August (1)
    • ►  June (1)
    • ►  April (1)
    • ►  March (3)
    • ►  February (5)
    • ►  January (3)
  • ►  2011 (19)
    • ►  November (3)
    • ►  July (2)
    • ►  June (1)
    • ►  May (4)
    • ►  April (2)
    • ►  March (1)
    • ►  February (3)
    • ►  January (3)
  • ►  2010 (17)
    • ►  December (1)
    • ►  November (6)
    • ►  September (1)
    • ►  August (1)
    • ►  June (2)
    • ►  May (1)
    • ►  April (3)
    • ►  February (1)
    • ►  January (1)
  • ►  2009 (18)
    • ►  December (3)
    • ►  November (1)
    • ►  October (5)
    • ►  September (7)
    • ►  July (2)
Powered by Blogger.

About Me

Unknown
View my complete profile