Pentaho Data Integration (Kettle): Command line arguments and scheduling
Tutorial Details
- Knowledge: Intermediate (To follow this tutorial you should have good knowledge of the software and hence not every single step will be described)
- OS: Linux or Mac OS X
- Tutorial files can be downloaded here
Once you tested your transformations and jobs there comes the time when you have to schedule them. You want to have a certain amount of flexibility when executing your Pentaho Data Integration/Kettle jobs and transformations. This is where command line arguments come in quite handy.
A quite common example is to provide the start and end date for a SQL query that imports the raw data. Kettle makes it very easy actually to set this up.
Approach to provide arguments to one step in a transformation
If you just need the arguments for one step only, then you can use the Get System Info step and create a hop to your Database Input step.
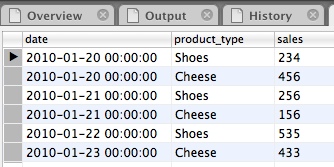
We will be working with following data set:
Open your favourite SQL Client (and start your MySQL server if it is not running yet) and issue following SQL statements:
USE
test
;
DROP TABLE IF EXISTS
`sales`
;
CREATE TABLE
`sales`
(
`date` DATETIME,
`product_type` VARCHAR(45),
`sales` INT(255)
)
;
INSERT INTO
`sales`
VALUES
('2010-01-20 00:00:00','Shoes',234),
('2010-01-20 00:00:00','Cheese',456),
('2010-01-21 00:00:00','Shoes',256),
('2010-01-21 00:00:00','Cheese',156),
('2010-01-22 00:00:00','Shoes',535),
('2010-01-23 00:00:00','Cheese',433)
;
SELECT
*
FROM
`sales`
;
CREATE TABLE
`sales_staging`
(
`date` DATETIME,
`product_type` VARCHAR(45),
`sales` INT(255)
)
;
Our goal is to provide the start and end date arguments to our SQL query.
Now let's create our transformation:
- Open Kettle and create a new transformation
- Drag and drop a Get System Info step on the canvas. You can find it in the Input folder on the left hand side.
- Double click on it and populate the names column in the grid with start_date and end_date.
- For the type choose command line argument 1 and command line argument 2 respectively

Now add a Table input step and a Table output step (we keep it very simple). Create hops between all these steps in the order that they were mentioned.
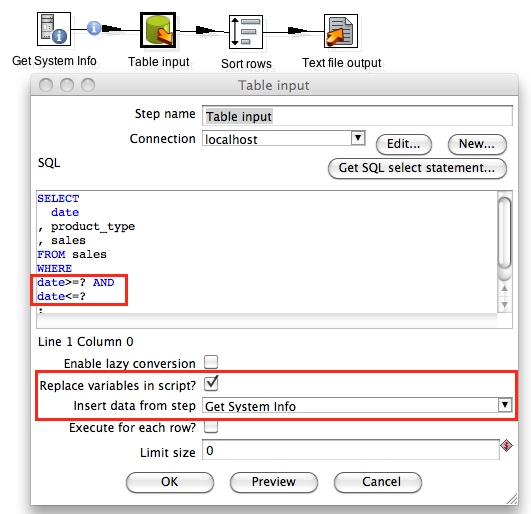
Double Click on the Table Input step and populate the SQL field with the query shown below:
SELECT
date
, product_type
, sales
FROM sales
WHERE
date>=? AND
date<?
;
You can feed the start and end date from the Get System Info step to a Table Input step and use the start and end date in the WHERE clause of your SQL query (highlighted in yellow). The question marks will be replaced on execution by the start and end date (but make sure they are defined in this order in the Get System Info step).
Make sure that you enable Replace variables in script? and choose the Get System Info step for Insert data from step.
Define a New ... connection (Connection Name: Localhost, Connection Type: MySQL, Host Name: localhost, Database Name: test, Port Number: 3306, your user name and password).
Click OK. The hop between the Get System Info step and the Table Input step now also displays an info icon.
And this is all that you have to do: Your transformation now accepts command line arguments!
So now let's try to execute the transformation from the command line. Close all the files that we just created, then open your Terminal window.
My transformation is located in:
/Users/diethardsteiner/Dropbox/Pentaho/Examples/PDI/command_line_arguments/tr_get_command_line_arguments.ktr
To execute a transformation from the command line, we have to call pan.sh, which is located in my case in:
/Applications/Dev/PDI\ 4.1\ RC1/pan.sh
Use following approach to execute the transformation (replace the file paths by yours):
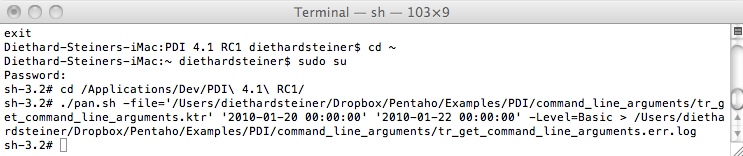
Change to the PDI directory:
cd /Applications/Dev/PDI\ 4.1\ RC1/
Use the super user and provide the password:
sudo su
Issue following command (replace yellow highlighted paths with your paths):
./pan.sh -file='/Users/diethardsteiner/Dropbox/Pentaho/Examples/PDI/command_line_arguments/tr_get_command_line_arguments.ktr' '2010-01-20 00:00:00' '2010-01-22 00:00:00' -Level=Basic > /Users/diethardsteiner/Dropbox/Pentaho/Examples/PDI/command_line_arguments/tr_get_command_line_arguments.err.log
Command line parameters (highlighted in red) have to be mentioned after the file argument. Mention them in the order that you expect them to be received in Kettle. The level argument (highlighted in blue) specifies the logging level. Following levels are available (from the most detailed one to the least detailed one): Rowlevel, Detailed, Debug, Basic, Minimal, Error, Nothing.
Pan accepts many more arguments, i.e. to connect to the repository. Please have a look at the Pan User Documentation for all the details.
Once the command is issued and you get no error message returned (check the error file), let's check the data that got exported to our output table:

As you can see from the screenshot above, only the data covering our specified timeframe got processed.
Approach to provide arguments to more transformations and jobs
If you plan to use the command line arguments in more than one step and/or more transformations, the important point is that you will have to do this in a separate transformation which has to be executed before the transformation(s) that require(s) these variables. Let’s call this transformation Set Variables.
The Set Variables transformation has two steps:
- Get System Info: It allows you to define variables that are expected to come from the command line
- Set Variables: This one will then set the variables for the execution within Kettle, so that you can use them in the next transformation that is specified in your job.
Note: The command line arguments enter Kettle as a String. In some cases the variable is expected to be of a certain data type. Then you will have to use the Get Variable step in a succeeding transformation to define the specific data type for each variable. |
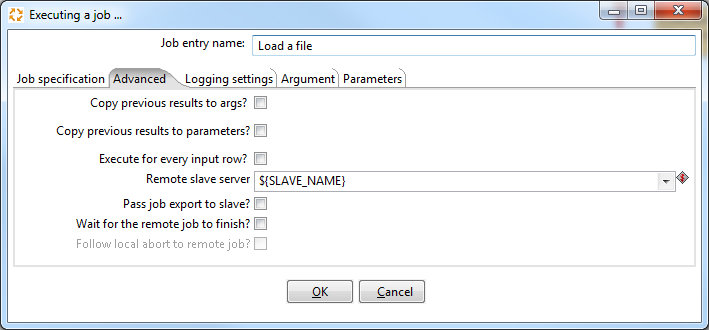
There is no additional adjustment needed. Do not fill out the Parameters tab in the Transformation properties or Job properties with these variables!
We can now change our main transformation to make use of these variables.
A typical scenario would be the following: Our ETL process populates a data warehouse (DWH). Before we insert the compiled data into the DWH, we want to make sure that the same data doesn't already exist in it. Hence we decide, that we just want to execute a delete statement that clears the way before we add the newly compiled data.
Our ETL job will do this:
- Initialise the variables that are used through the job (done in a dedicated transformation)
- Delete any existing DWH entries for the same time period (done in a SQL job entry)
- Main ETL transformation
Let's start:
- Create a new transformation and call it tr_set_variables.ktr
- Drag and drop a Get System Info step on the canvas. You can find it in the Input folder on the left hand side.
- Double click on it and populate the names column in the grid with start_date and end_date.
- For the type choose command line argument 1 and command line argument 2 respectively
- Next drag and drop the Set Variables step from the Job Folder onto the canvas and create a hop from the Get System Info step to this one.
- Double click the Set Variables step and click on Get Fields:
Clicking Get Fields will automatically define all input fields as variables. If you don't need all, just delete the relevant rows. In our case we want to keep all of them. Kettle will also automatically capitalize the variable names. As I want to avoid any confusion later on, I explicitly prefix my variables in Kettle with VAR_. You can also define scope type and set a default value.
We have now create a transformation that accepts command line arguments and sets them as variables for the whole job.
Next, let's create the main ETL transformation:
- Open tr_get_command_line_arguments (which we created earlier on) and save it as tr_populate_staging_tables.
- Delete the Get System Info step. We don't need this step any more as we define the variables already in tr_set_variables.
- Double click the Table input step. As our variable can be referenced by names, we have to replace the question marks (?) with our variable names like this:
SELECT
date
, product_type
, sales
FROM sales
WHERE
date>="${VAR_START_DATE}" AND
date<"${VAR_END_DATE}"
;
The variables are now enclosed by quotation marks as we want the date to be treated as string. - Click Ok and save the transformation.
- Create a new job and name it jb_populate_staging_tables.
- Insert following job entries in the order specified and connect them with hops:
- Start entry
- Tranformation entry: Double click on it and choose tr_set_variables.ktr as the Transformation filename.
- From the Script Folder choose the Execute SQL script ... job entry: Define a New ... connection (Connection Name: Localhost, Connection Type: MySQL, Host Name: localhost, Database Name: test, Port Number: 3306, your user name and password). Tick Use variable substitution?. Insert following query:
DELETE FROM
sales_staging
WHERE
date>="${VAR_START_DATE}" AND
date<"${VAR_END_DATE}"
;
Pay attention to the where clause: The variables are now enclosed by quotation marks as we want the date to be treated as string. Also note that the date restriction is exactly the same as the one we use for the raw data import. - Transformation entry: Double click on it and choose tr_populate_staging_tables.ktr as the Transformation filename.

So now let's try to execute the transformation from the command line. Close all the files that we just created, then open your Terminal window.
My job is located in:
/Users/diethardsteiner/Dropbox/Pentaho/Examples/PDI/command_line_arguments/jb_populate_staging_tables.kjb
To execute a job from the command line, we have to call kitchen.sh, which is located in my case in:
/Applications/Dev/PDI\ 4.1\ RC1/pan.sh
Use following approach to execute the transformation (replace the file paths by yours):
Change to the PDI directory:
cd /Applications/Dev/PDI\ 4.1\ RC1/
Use the super user and provide the password:
sudo su
Issue following command (replace yellow highlighted paths with your paths):
./kitchen.sh -file='/Users/diethardsteiner/Dropbox/Pentaho/Examples/PDI/command_line_arguments/jb_populate_staging_tables.kjb' '2010-01-20 00:00:00' '2010-01-22 00:00:00' -Level=Basic > /Users/diethardsteiner/Dropbox/Pentaho/Examples/PDI/command_line_arguments/jb_populate_staging_tables.err.log
Command line parameters (highlighted in red) have to be mentioned after the file argument. Mention them in the order that you expect them to be received in Kettle. The level argument (highlighted in blue) specifies the logging level. Following levels are available (from the most detailed one to the least detailed one): Rowlevel, Detailed, Debug, Basic, Minimal, Error, Nothing.
Kitchen accepts many more arguments, i.e. to connect to the repository. Please have a look at the Kitchen User Documentation for all the details.
Inspect the error log to see if the job ran successfully. Then have a look at the staging table to see if the data got imported.
Using named Parameters
Named parameters are special in the sense that they are explicitly named command line arguments. If you pass on a lot of arguments to your Kettle job or transformation, it might help to assign those values to an explicitly named parameter.
Named Parameters have following advantages:
- On the command line you assign the value directly to a parameter, hence there is zero chance of a mix-up.
- A default value can be defined for a named parameter
- A description can be provided for a named parameter
- No need for an additional transformation that sets the variables for the job
Let's reuse the job that we created in the previous example:
- Open jb_populate_staging_tables.kjb and save it as tr_populate_staging_tables_using_named_params.kjb.
- Delete the Set Variables job entry and create a hub from the Start to the Execute SQL script entry.
- Click CTRL+J to call the Job properties dialog.
- Click on the Parameters tab and specify the parameters like this:
In our case we don't define a default value. The reason for this is that we don't want to import any raw data in case there is no start and end date defined.
- Click Ok and save the job.
Our job is completely set up. Let's execute it on the command line:
./kitchen.sh -file='/Users/diethardsteiner/Dropbox/Pentaho/Examples/PDI/command_line_arguments/jb_populate_staging_tables_using_named_params.kjb' -param:VAR_START_DATE='2010-01-20 00:00:00' -param:VAR_END_DATE='2010-01-22 00:00:00' -Level=Basic > /Users/diethardsteiner/Dropbox/Pentaho/Examples/PDI/command_line_arguments/jb_populate_staging_tables_using_named_params.err.log
I described the various kitchen arguments in the previous section, so I won't repeat it here. The only difference here are the named parameters (highlighted in yellow).
Inspect the error log to see if the job ran successfully. Then have a look at the staging table to see if the data got imported.
As you can see, named parameters are the crème de la crème!
Scheduling a job on Linux
Now that we have quite intensively explored the possibilites of passing command line arguments to Kettle, it's time to have a look at scheduling:
On Linux crontab is a popular utility that allows to schedule processes. I will not explain crontab here, if you are new to it and want to find out more about it, have a look here.
Our plan is to schedule a job to run every day at 23:00. We pass on two command line arguments to this job: the start and the end datetime. It's required that this job imports each time the raw data of the last two days (23:00 to 23:00). To calculate the start and end date for the raw data processing we will write a shell script. The plan is to schedule this shell script using crontab.
You can edit the crontab by issuing following command:
crontab -e
This will display any scheduled processes. If you are familiar with vi, you can use the same commands here to edit and save. Click i to insert the following:
00 23 * * * /jb_populate_staging_tables_daily.sh
Press ESC followed by :wq to save and exit crontab.
Navigate to the folder where you saved all the jobs and transformations. Create this shell script with vi and name it jb_populate_staging_tables_daily.sh:
cd /Applications/Dev/PDI\ 4.1\ RC1;./kitchen.sh -file='/Users/diethardsteiner/Dropbox/Pentaho/Examples/PDI/command_line_arguments/jb_populate_staging_tables.kjb' "`date --date='2 days ago' '+%Y-%m-%d 23:00:00'`" "`date --date='1 day ago' '+%Y-%m-%d 23:00:00'`" -Level=Basic > populate_staging_tables_daily.err.log
Note: We enclosed our arguments with double quotes. We used enclosing back ticks to indicate that a shell command has to be executed. There is also a blank in our argument, which we enclosed by using single quotes (otherwise Linux is expecting another argument). |
Our job is now scheduled. Make sure that you check after the first run for any errors.
In this article you learnt about creating flexible jobs and transformations by using command line arguments. We also had a quick look at scheduling your jobs. I hope this article demonstrated that it is quite easy to set this up.